Reconciling Your Bank Account
You should reconcile your bank account as soon as you’ve finished the business setup process and have entered all your historical transactions. You should then reconcile the register each time you receive a bank statement.
To reconcile your account:
- In the Banking Navigator, click the Reconcile icon, or select Reconcile from the Banking menu.
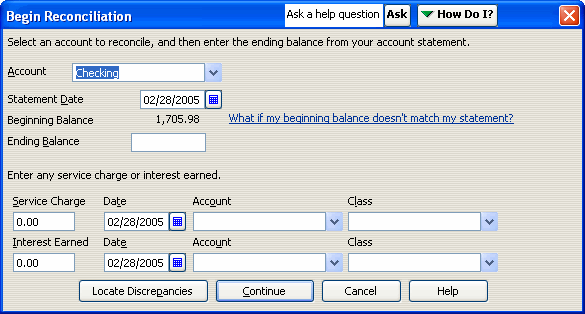
The Begin Reconciliation window opens.

- Select the account you’re reconciling from the drop-down menu.
- Enter the date of the bank statement you’re using for reconciliation. If you’re reconciling after entering historical transactions, you should use the bank statement that covers the start of your fiscal year.
- Compare the beginning balance QuickBooks has displayed with the beginning balance shown on your statement. If the balances are the same, continue with the next step. If the balances are different, you have several options:
- Click Cancel to cancel the reconciliation. Then open the account register and find and fix the problem. Once you’ve done this, begin reconciliation again.
Note: Transactions you cleared in your account register are excluded from the beginning balance; if you’ve used your register to clear transactions, ignore the discrepancy. You can clear the transactions in the next window.
-
- Click Locate Discrepancies. In the Locate Discrepancies window, click Discrepancy Report to view a list of transactions that were modified since the account was last reconciled. Make any necessary changes to the transactions and, in the Locate Discrepancies window, click Restart Reconciliation to continue.
- Ignore the discrepancy and let QuickBooks add a balance adjustment transaction.
- Enter the ending balance from your statement.
- Enter any service charges or interest earned and select the account used to track each.
- Click Continue.
The Reconcile window opens, listing uncleared checks and deposits.

- Compare each check and deposit with the ones listed on your bank statement. Click on each item in QuickBooks as you match it; this places a checkmark next to the item, indicating it will be cleared.
-
- If a transaction amount doesn’t match the amount shown on your statement, double-click the transaction to open it and make the necessary changes. Then save and close the transaction to return to the Reconcile window.
- If a transaction shown on your statement is missing entirely from your register, open your register and enter the transaction. Then save and close it to return to the Reconcile window.
- As you clear transactions, QuickBooks calculates the total amount you’ve cleared against the statement and displays the difference. When the difference is 0.00, click Reconcile Now.
If you finish clearing the transactions and QuickBooks still shows a difference (a discrepancy), then you can either use the methods described above to find and fix the discrepancy, or you can click Reconcile Now to have QuickBooks enter a balance adjustment. If you later find the source of the problem and are able to correct it, you can (and should) delete the balance adjustment transaction from your register.

