Entering and Paying Bills
Entering Bills
You should enter bills for all expenses you don’t pay immediately, including items you receive against a purchase order or for which you’ve created an item receipt. Bills for expenses are tracked using expense accounts, while bills for items are tracked using the Item or Fixed Asset Item List.
To enter a bill for items you’ve already received, and for which you’ve created an item receipt:
- In the Vendor Navigator, click the Receive Bill icon.
The Select Item Receipt window opens.
- Select the vendor from the drop-down menu.
- Select the item receipt that corresponds to the bill you received and click OK.
The Enter Bills window opens with the information contained in the item receipt.

- Make changes to the information as necessary and click Save & Close.
To enter a bill for all other expenses, including items you’ve received for which you haven’t created an item receipt:
- Click the Bill
 button on the QuickBooks toolbar, or select Enter Bills from the Vendors menu.
If you’re receiving items from a vendor and the bill has been included with the items (that is, no item receipt exists), you can also click the Receive Items with Bill icon in the Vendor Navigator.
The Enter Bills window opens.
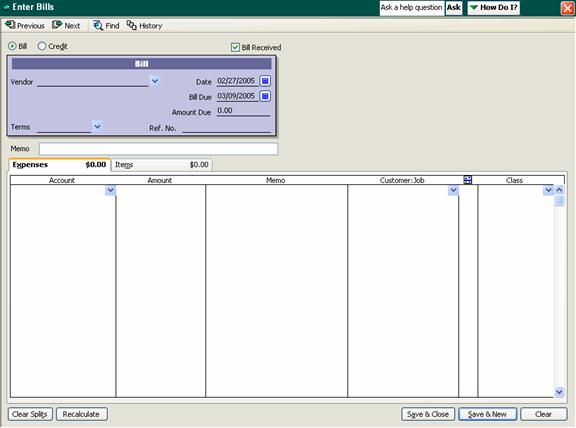
- If the bill is for an expense, select the Expenses tab. If the bill is for items you’re purchasing, select the Items tab.
- At the top of the window, select the vendor from the drop-down menu, or enter a new one by typing directly into the field. If you entered a new vendor, you can click the Quick Add button when prompted and enter detailed information for the vendor later. (Alternatively, you can click the Set Up button when prompted to enter detailed vendor information now.)
- If a purchase order exists for this vendor, you’re prompted to receive against it. Click Yes and, in the Open Purchase Orders window, select each purchase order containing the items reflected on the bill. Click OK.
- Change the date and due date of the bill as necessary.
- Enter the amount due and complete the Ref. No., Terms and Memo fields as necessary.
- If the bill is for an expense, select an expense account from the drop-down menu in the Account field. If the bill is for items, click inside the Item field and select the item from the drop-down menu. If you received the items against a purchase order, these items should already appear in the list; you can edit them as necessary.
Note: To enter charges not associated with a specific item, such as shipping or tax, select the Expenses tab and enter each charge, selecting the appropriate expense account.
- Click the Save & Close button to save the bill, or Save & New to save the bill and enter a new one.
Paying Bills
To pay a bill you’ve entered:
- Click the Pay Bills icon in the Vendor Navigator, or select Pay Bills from the Vendors menu.
- If necessary, select the accounts payable account to use.
The Pay Bills window opens.
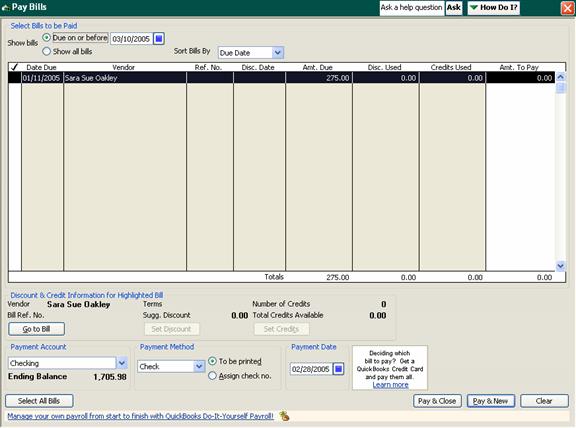
- You can filter the list of bills displayed in the window by selecting the Due on or before option and entering a date.
- To pay multiple bills, click inside the checkmark column for each bill. This places a checkmark next to each of the bills you select.
- If you have any discounts or credits, enter these into the Disc. Used and Credits Used fields.
- For each bill, enter the amount you’re paying.
- Select a payment account and method from the drop-down menus at the bottom of the window and complete the remainder of the fields as appropriate.
- Click Pay & Close.
Writing Checks
To pay bills when you receive them, use the Write Checks window. Do not use this window to pay taxes or bills you’ve already entered.
To write a check:
- Click the Check button on the QuickBooks toolbar, or select Write Checks from the Banking menu.
The Write Checks window opens.
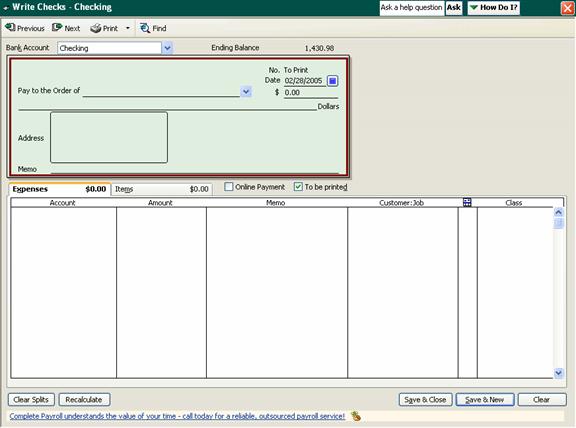
- Select the account you want to use from the Bank Account drop-down menu.
- Select a name from the Pay to the Order of drop-down menu.
- If an open purchase order exists for the payee, QuickBooks prompts you to receive items against it. Click Yes if you’re paying for items you’re receiving, or No if you’re making an over-the-counter purchase.
If you’re receiving items against a purchase order, select the purchase order in the window that opens and click OK. You can select multiple purchase orders if necessary.
- If you’re receiving items against a purchase order, QuickBooks populates the remainder of the fields with the items contained in the purchase order and the total amount. You can edit this information as necessary. Otherwise, enter the amount you’re paying into the $ field.
Note: You can leave the amount blank and have QuickBooks automatically complete it based on the total of the item amounts you enter.
- Add to or edit the Address and Memo fields as necessary.
- To enter an item, select it from the drop-down menu on the Items tab.
- For each item, enter the quantity and cost.
- If you’re purchasing the item for a particular customer or job, select the customer and/or job from the Customer:Job drop-down menu.
- If appropriate, select the class in which the item belongs.
- Enter any expenses, such as shipping and taxes, using the Expenses tab. You should also use this tab if you’re writing a check for an expense, such as a utility bill, rather than for items. Be sure to associate the expense with the appropriate expense account.
- If you’ll be printing the check using your printer, make sure the To be printed box is checked; otherwise, uncheck this box and enter a check number.
- To print the check, click the Print button at the top of the window. In the dialog that opens, enter the printed check number and click OK. In the Print dialog, confirm the printer settings and click Print.
To print multiple checks, click the down arrow on the Print button and select Print Batch. In the window that opens, select the checks you want to print. Then enter the first check number and click OK.
- Click Save & Close to save the check, or Save & New to save the check and write a new one.
Paying Sales Tax
When the time comes to pay sales tax, you should use the Pay Sales Tax function, rather than Pay Bills or Write Checks:
- In the Vendor Navigator, click the Pay Sales Tax icon, or select Sales Tax, and then Pay Sales Tax, from the Vendors menu.
The Pay Sales Tax window opens.
- Select the account to pay taxes from.
- Confirm the through date for the tax. If necessary, you can edit the date.
Note: To confirm or change the sales tax period set up for your company, select Preferences from the Edit menu. In the Preferences window, select the Sales Tax icon. Under Pay Sales Tax, select the appropriate tax period-monthly, quarterly or annually.
- Select the tax agencies you want to pay by clicking inside the Pay column. Alternatively, click Pay All Tax to pay all the taxes shown.
- To make a partial payment, change the amount in the Amt. Paid column.
- Click OK.
Memorizing Transactions
Memorizing a transaction saves its details so you can easily re-enter it on a regular basis; this is most useful for regular payments, such as utility bills. You can have QuickBooks remind you when the transaction needs to be entered, or automatically enter it for you.
To memorize a transaction:
- Enter the transaction (for example, a check or a bill) as you want it memorized.
Leave blank any fields you’ll need to change, such as the Amount field, if the amount varies from transaction to transaction.
- From the Edit menu, select the appropriate Memorize command (such as Memorize Check or Memorize Bill).
The Memorize Transaction window opens.
- Enter a name for the memorized transaction, such as Utility Bill.
- If you want QuickBooks to remind you to enter the transaction when it’s due, select Remind Me; if you want QuickBooks to automatically enter the transaction for you, select Automatically Enter. Otherwise, select Don’t Remind Me.
- If you opted to have QuickBooks remind you to enter the transaction, select how often you want to be reminded, and enter the date the reminders should begin.
- Click OK.
- If you created the transaction for the purpose of memorizing it, but don’t want to enter the transaction now, click Clear and then close the window. Otherwise, save the transaction as usual.