Managing Your Accounts
The Chart of Accounts lists all the accounts you’ve created for your company. From here, you can add, edit and delete accounts, open the register for a particular account and enter account transactions.
To open the Chart of Accounts, click the Accnt ![]() button on the QuickBooks toolbar, or select Chart of Accounts from the Lists menu. You can also access the Chart of Accounts by clicking the Chart of Accounts icon in the Company Navigator.
button on the QuickBooks toolbar, or select Chart of Accounts from the Lists menu. You can also access the Chart of Accounts by clicking the Chart of Accounts icon in the Company Navigator.
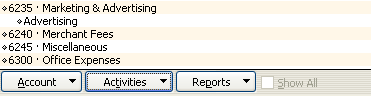
The Chart of Accounts opens in a new window:

Double-clicking any account in the list opens the account register, where you can view and enter account transactions.
The buttons at the bottom of the window contain commands for accomplishing account-level tasks, such as creating and editing accounts, writing checks and running reports.
Setting up New Accounts
You can add a new account at any time after you’ve completed the business setup process:
- On the QuickBooks toolbar, click the Accnt button, or select Chart of Accounts from the Lists menu.
- At the bottom of the Chart of Accounts, click the Account button and select New from the menu that appears:
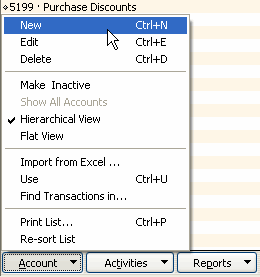
The New Account window opens.
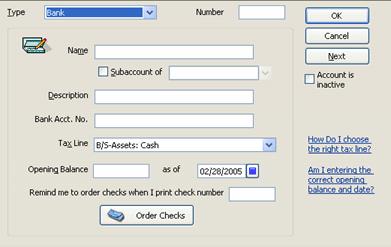
- From the Type drop-down menu, select the account type.
- In the Name field, enter a name for the account.
- If the account numbering option is turned on, enter a number for the account into the Number field.
The account numbering option lets you select accounts by the numbers you’ve given them. Developing and using a numbering scheme can help you select accounts quickly when completing forms. To turn on the option, select Preferences from the Edit menu. In the Preferences window, select the Accounting icon from the list on the left, and then select the Company Preferences tab. Finally, check the Use account numbers box and click OK.
- You can make the account a subaccount by checking the Subaccount of box. Select the parent account from the drop-down menu.
- If you like, enter a description for the account into the Description field.
- Enter the account number into the Bank Acct. No. field.
- If the account is an income or expense account, select a tax line from the Tax Line drop-down menu; otherwise, select <Not tax-related>.
- Enter the opening balance and your business start date. If the account is new, use the date the account was opened.
- Click OK to add the account and close the window. Or, to add another account, click Next.
Editing Account Information
To edit account information:
- In the Chart of Accounts, highlight the account you want to edit.
- Click the Account button and select Edit from the menu.
- Make the necessary changes to the fields and click OK.
Changing the Opening Balance for an Account
If you need to adjust the opening balance you recorded for an account, you should open the account register and adjust the amount of the transaction:
- In the Chart of Accounts, double-click the account whose opening balance you need to change.
The account register opens.
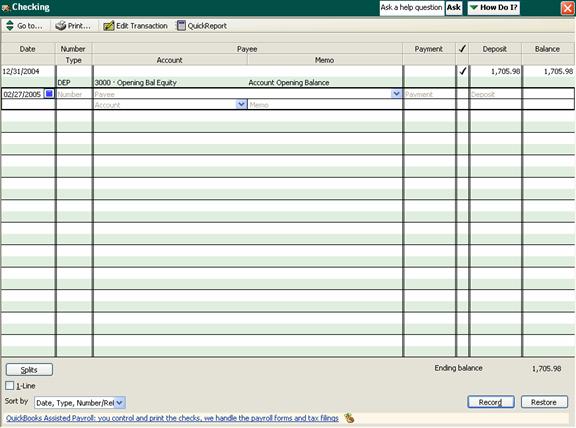
- Click inside the Deposit field for the opening balance transaction. This is usually the first transaction in the register and is labeled Opening Bal Equity in the Account column.
- Change the amount recorded.
- Click the Record button at the bottom of the window, or press Enter.
- When prompted, click Yes to confirm the change.
- To close the register, click the close button
 in the upper right-hand corner of the window.
Deleting Accounts
You can delete an account as long as it has no balance and is not used in payroll. To delete an account:
- In the Chart of Accounts, highlight the account you want to delete.
- Click the Account button and select Delete from the menu.
- When prompted, click OK to confirm that you want to delete the account.
Generally, unless the account was created in error, it’s better to maintain records for it. You can do this while hiding the account from daily operations by inactivating it.
Inactivating and Reactivating Accounts
When an account is inactive, it does not appear in drop-down menus or in the Chart of Accounts unless you select the Show All Accounts option. You might make an account inactive, for example, when the account is closed but you want to maintain a record of it.
To inactivate an account:
- In the Chart of Accounts, highlight the account you want to inactivate.
- Click the Account button and select Make Inactive from the menu.
The account disappears from the Chart of Accounts. To view it in the list, click the Account button and select Show All Accounts. Inactive accounts appear with an X next to them.
To reactivate an inactive account:
- In the Chart of Accounts, make sure the Show All Accounts option is turned on.
- Highlight the account you want to reactivate.
- Click the Account button and select Make Active from the menu.
Setting Up Classes
The Class List lists all the classes you’ve created for your account transactions. Classes let you break down your business by transactions, so that you can track income and expenses by the various segments of your business, such as a retail location, a department or a particular enterprise. When classes are enabled, a Class field appears in your various account registers, letting you select a class for the transactions you enter.
If you enabled the use of classes during the EasyStep Interview, you can set up your classes now. If you didn’t enable classes and want to do so now, or you want to turn off classes:
- From the Edit menu, select Preferences.
- In the Preferences window, select the Accounting icon from the list on the left, and then select the Company Preferences tab.
- Check the Use class tracking box (or uncheck the box if you want to turn off the option).
- Click OK.
To open the Class List, select Class List from the Lists menu. From here, you can add, edit or delete a class using the Class button at the bottom of the window.
To add a new class:
- In the Class List, click the Class button and select New.
The New Class window opens.
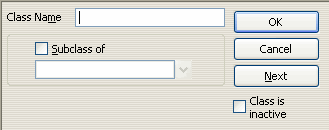
- Enter a name for the class.
- To make the class a subclass, select the Subclass of checkbox and then select the parent class from the drop-down menu. If necessary, select <Add New> and, in the window that opens, enter a name for the new parent class and click OK.
- Click OK to save the class, or Next to save the class and add a new one.