Microsoft Word 2007 is a word processing software package, allowing you to create everything from letters to a formatted book. Microsoft changed the interface entirely from Office 2003 to Office 2007. This tutorial explores Microsoft Word 2007 and its new ribbon interface – a much different design from the menus based software you’ve been used to in the past. We’ve found even power users find it difficult to immediately become proficient with Word 2007. In our first Word tutorial, Microsoft Word Foundations, we explored working with the new Office and Word 2007 user interface. In this tutorial, we explore working with text and formatting your document.
Working with Text
Inserting and Deleting Text
To insert text into a document, position your cursor where you want the text to appear and begin typing.
You can position your cursor using the mouse or the keyboard. To use your mouse, simply point and click where you want to type. The mouse pointer indicates where you can type by changing to an I-Beam ![]() .
.
You can use the arrow keys on your keyboard to move up, down, left, or right. The up and down arrow keys move the insertion point up or down one line at a time, while the left and right arrow keys move the insertion point one character at a time.
Word has two typing modes: Insert and Overtype. Insert mode (the default) lets you insert text as you type. This means that you can position your insertion point anywhere inside a block of text and begin typing, and the new text will be inserted before the existing text. Use Overtype mode to type over existing text.
In previous versions of Word, you used the Insert key on your keyboard to switch between these two modes, but for Word 2007, Microsoft made this optional, presumably because users frequently hit the key by mistake. So the Insert key is disabled by default, and to enable Overtype mode, you have to click the Insert button on the status bar:

The Insert button toggles between the two modes, so to switch back to Insert mode, just click it again.
Note:
If you don’t see the Insert button, right-click on the status bar and select Overtype from the pop-up menu.
Tip:
If you liked using the Insert key to switch modes, you can change the default through the Word Options dialog:
- Click the Microsoft Office button
 .
. - At the bottom of the menu, click Word Options.
- In the Word Options dialog, select the Advanced category.
- Under Editing options, select the checkbox Use the Insert key to control overtype mode.
To change the default typing mode to Overtype, select Use overtype mode.
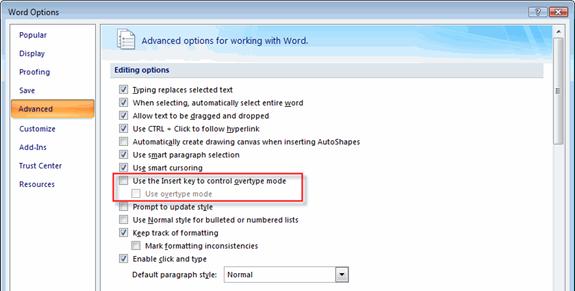
- Click OK.
To delete text, use either the Backspace or Delete key on your keyboard:
- The Backspace key deletes the character to the left of the insertion point.
- The Delete key deletes the character to the right of the insertion point.
You can use either of these keys to delete selected (highlighted) text.