How to Change the Word Document Size
To change the size of a Word document:
- Open the File menu and select Page Setup.
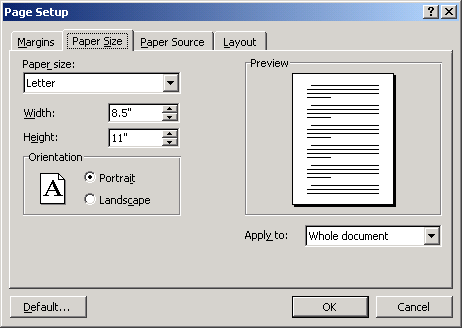
The Page Setup dialog opens.
- Click the Paper Size tab.

- Microsoft Word defaults to letter size, with portrait orientation. To change the orientation of the page to landscape, select the Landscape option button. Word changes the orientation of the page in the Preview pane so you can see how the page will appear.
- To change the paper size, select one of the pre-defined options from the Paper Size menu, or select Custom size to define a size using the Width and Height fields.
Although you can define any paper size in this dialog, the document won’t print correctly unless your printer supports that paper size. When you click OK to exit this dialog, Word will warn you if the margins of the page are outside the printable range for your printer. You can choose to continue, or to return to the dialog to change the settings.
![]() Tip:
Tip:
Despite Word’s warning, you can often still print your document. For example, if you define a custom paper size that’s smaller than letter size, then print the document on letter paper, Word will confine the printable area to the size you specified. You can then trim the paper as necessary.
Set Margins
To define the margins for a Word document:
- Open the File menu and select Page Setup.
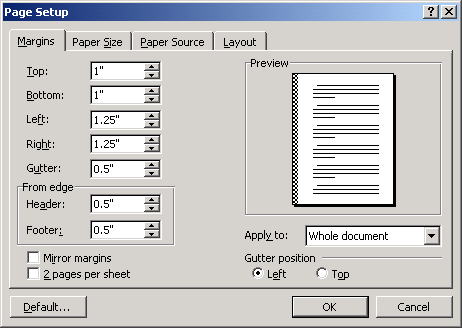
- In the Page Setup dialog, click the Margins tab.
- Enter the number of inches you want the main text of the page to appear from the top, bottom, left, and right edges of the page.
- The Gutter field lets you define extra space for the left or top margin of a document for binding:
- First, enter the amount of additional space you want to reserve for binding. This prevents text from being cut off by the binding. Notice that Word changes the picture in the Preview pane so you can see how the pages will appear with the binding.


-
- Second, specify left or top binding by selecting the appropriate radio button under Gutter position.
- If you selected the Left gutter position, 2 additional options are available: Mirror margins and 2 pages per sheet.
·Use Mirror margins to set up facing pages for double-sided documents. When you check this option, the Left and Right margin fields change to Inside and Outside, letting you specify the margins for the inside (binding side) and outside margins of the page.
·When you select 2 pages per sheet, Word reduces each page in your document by 50% and fits 2 pages to each sheet of paper.
- Finally, specify the position of your header and footer by entering the number of inches you want these to appear from the edge of your page. The header and footer will appear between the edge of your page and the top and bottom margins you specified for your main text. For example, if you specified a top margin of 1 inch and a header margin of .5 inch, your header will appear .5 inch from the top of the page, and the main text will begin 1 inch from the top of the page, or .5 inch below the header.
![]()
![]()
![]()
![]()
It’s a good idea to keep at least a quarter of an inch between the top of the page and the header, and between the header and the main text. Most printers are unable to print on the outside quarter-inch of the page on all sides, since this is the space the printer uses to grip the page.
- When you’ve finished entering your settings, click OK to apply them to the document and close the dialog.
![]()
![]()
![]()
![]()
You can quickly change the page margins by clicking and dragging the margin boundaries at the edges of the horizontal and vertical rulers.
![]()
![]()
Hold down the Alt key while you drag to display the measurements of the margins.

