Track Changes
Word’s track changes feature lets you track the changes you make to a document, and later accept or reject these changes as necessary. The most common use for this feature is among multiple document reviewers, who make changes to the document that are tracked by Word and then either accepted or rejected by the author.
To turn on the track changes feature, click the Track Changes ![]() button on the Reviewing toolbar, or open the Tools menu, select Track Changes, and then Highlight Changes. In the Highlight Changes dialog, select Track changes while editing.
button on the Reviewing toolbar, or open the Tools menu, select Track Changes, and then Highlight Changes. In the Highlight Changes dialog, select Track changes while editing.
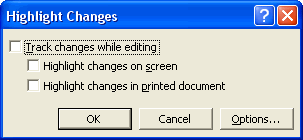
In the Highlight Changes dialog, select Highlight changes on screen to see the changes that have been made to the document. Word displays these changes using a different color for each reviewer. As you move your mouse over each change, Word displays a pop up telling you the type of change made (for example, inserted or deleted) and the reviewer who made the change.
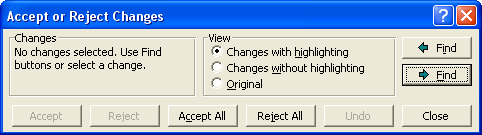
To accept or reject changes:
- Review each change using the Next Change
 or Previous Change button on the Reviewing toolbar.
 - When Word stops at a change, accept it by clicking the Accept Change button, or reject it by clicking the Reject Change button.
The Document Map
The Document Map displays the headings in your document in a pane in the left side of the document window. You can easily jump from one location to another in your document simply by clicking one of the headings in the map.
![]() To show or hide the Document Map, click the Document Map button on the Standard toolbar.
To show or hide the Document Map, click the Document Map button on the Standard toolbar.