Create a Header
A header is a line of text appearing across the top of each of your pages. Sometimes, the information in the header (such as title and page number) is the same on every page of the document; other documents, often those using facing pages, use two or more headers, so that different information appears on different pages (for example, the report title on even-numbered pages and the chapter title on odd-numbered pages). There may be still other pages in a document—the cover page, for example—on which you want no header at all to appear. Word lets you accomplish all these tasks with relative ease.
To create a header:
- Open the View menu and select Header and Footer.
Word displays a dashed rectangle at the top of the page (the header region) and opens the Header and Footer toolbar.

- Type your header directly into the header region. You can use the buttons on the toolbar to insert AutoText, page numbers, and other automatically updated fields.
- When you’ve finished, click Close.
The dashed rectangle disappears, and the header text you entered appears at the top of the page.
![]()
![]()
![]()
Headers and footers are inserted and formatted the same way. Just use the Switch Between Header and Footer ![]()
![]()
The Header and Footer Toolbar
While you work within the body of your document, header text appears faded. When you scroll through the document, the cursor ignores this text, which is essentially inactive. To edit the header, just double-click anywhere in the header region.
Each time you activate the header, the Header and Footer toolbar appears.


Use the buttons on the toolbar to navigate among multiple headers, to insert AutoText and fields into your headers, and to link headers in multiple sections so the contents remain the same:
·To move between multiple headers in a document, use the Show Previous ![]()
![]()
![]()
![]()
·To insert AutoText, click Insert AutoText and select the text from the menu.
·Use the Insert Page Number ![]()
![]()
![]()
![]()
![]()
![]()
![]()
![]()
·You can link the header of the current section to the header of the previous section by clicking the Same as Previous ![]()
![]()
·To switch between the header and footer on a page, click the Switch Between Header and Footer ![]()
![]()
·To hide the document text while you work with the header, click the Show/Hide Document Text ![]()
![]()
Format Headers and Footers
You format headers and footers the same way you format text in the body of your document: simply select the text and apply the font and paragraph formatting of your choice using the Formatting toolbar.
Insert Page Numbers
To insert page numbers into a Word document:
- Open the Insert menu and select Page Numbers.
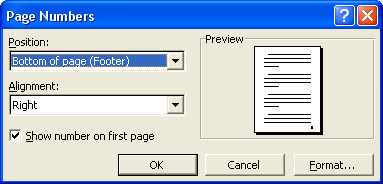
The Page Numbers dialog opens.


- From the Position drop-down menu, you can choose to place the page numbers at the top or bottom of the page. Bottom of page is selected by default.
- From the Alignment drop-down menu, select Left, Center, Right, Inside, or Outside. Inside and Outside are used for facing pages.
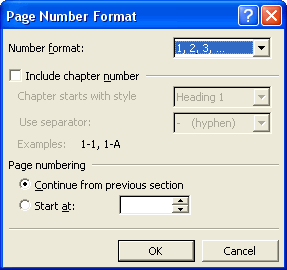
- Click the Format button to view additional options:


-
- Number format lets you specify Arabic or Roman numerals, uppercase or lowercase, or numbers or letters.
- Include chapter number inserts the chapter number, based on the style that’s been applied to the chapter’s heading, before the page number, using the separator you select.
- Under Page numbering, you can specify the page number the document (or section) should begin on. When a document includes multiple sections, each page is numbered consecutively by default. However, you can choose to have a new section in a document begin on “Page 1”; you might do this, for example, if one section contains a table of contents using lowercase page numbers, and the next section of the document contains “Chapter 1,” which should begin on “Page 1.”
- Click OK to return to the Page Numbers dialog.
- To insert the page numbers, click OK.
![]()
![]()
![]()
Follow the same steps to change the formatting of existing page numbers (for example, if you only need to change the number a page or section begins on). When you’ve finished making your selections from the Page Number Format dialog, close the dialog and, in the Page Numbers dialog, click Close instead of OK. Word applies the formatting to the existing numbers.

