Install Windows XP Professional by using the System Preparation Tool.
As we mentioned earlier, many companies develop a computer image which is applied to many computers. When using an approach like this, the company could experience problems on their network if they do not specifically prepare the operating system to be applied to many computers. The primary issue is with a computer SID.
The computer’s security identifier (SID) is a Microsoft developed string which provides a unique ID for every computer Windows is installed on. This allows Microsoft network operating systems (such as Windows 2003) to uniquely identify a machine not based on something that could change, such as computer name or user account. Microsoft uses SIDs for computers, user accounts, groups, and more. It uses these SIDs to grant or deny access based on the ACL (Access Control List), with the unique SID as the identifier.
If you simply install Windows and then duplicate the installation, you end up with multiple computers in the environment with the same SID which could cause some confusion when it comes to granting or denying access to resources.
Sysprep does a number of things, but it primary reason for use to create a new SID at startup of a freshly imaged PC.
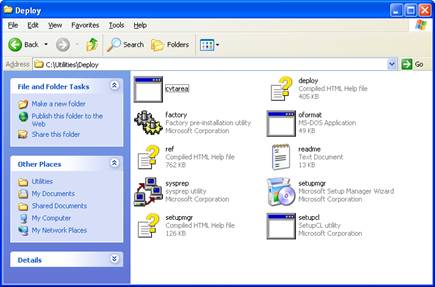
Sysprep is in the CD:\support\tools\deploy.cab file, along with several other deployment tools. Copy the deploy.cab file to your local Windows XP Professional computer and decompress the file. You can do this quickly by doubleclicking on the file, press Ctrl+A to select all, then press Ctrl+C to copy the files, navigate to an empty folder and press Ctrl+V to paste the files.
You run Sysprep as the last thing you do before creating a computer image. It sets itself to run on the next bootup, so you do not want to run this before you are ready to create your computer image.
Using Setup Manager to Create a Sysprep Answer File
Like the unattended installation process we described earlier, Sysprep uses an answer file for its configuration. You can create this information file manually, or use Setup Manager to prepare the file.
1.Open the Setup Manager application.
2.Click Next past the introduction screen.
3.Click Next to create a new answer file.
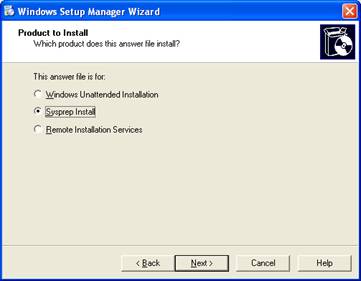
4.Select Sysprep Install and then click Next.
5.Select Windows XP Professional and click Next.
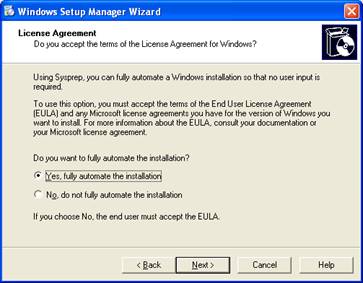
6.Next, Setup Manager asks if you want to complete the process with full automation. We do, so we select Yes, fully automate the installation and click Next.
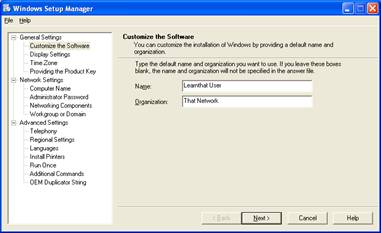
7.We are presented with the same configuration screen we saw earlier, go through the process and fill out all of the required information.
8.Once you are complete with all of the information, click Next.
9.Provide the path you would like to save the file to (e.g. c:\sysprep\sysprep.inf), click OK.
10.Close Setup Manager.
Creating Uniqueness Database File
Setup Manager also gives you the capability to create one answer file for multiple machines using a Uniqueness Database File (UDF). A UDF has multiple answers in one file for multiple computers – allowing you to select which section of the answer file to use during setup.
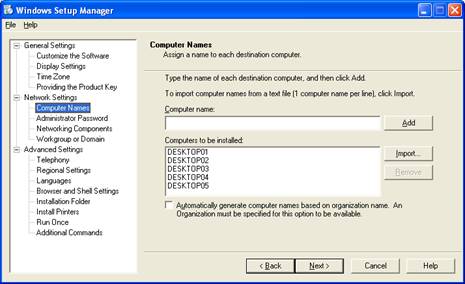
If you setup multiple computer names in Setup Manager, it will automatically create a UDF file for you.
Using Sysprep to Prepare a Computer Image
1.Create a folder on the C: drive: C:\sysprep.
2.Copy the sysprep.exe and setupcl.exe files to c:\sysprep.
3.Open the Sysprep application.
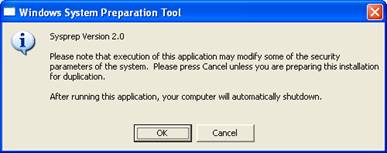
4.As we explained earlier, running the application will modify security parameters of the machine (including the SID). You should not run this on a production machine – especially not your primary work machine. For test purposes, we are running this in a Windows XP Pro virtual machine on Virtual PC 2007 (free download from Microsoft). Click OK to continue.
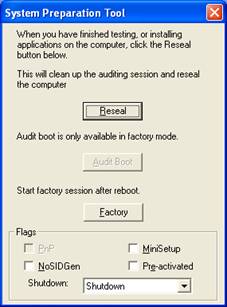
5.There are two primary options available: Reseal and Factory. For imaging purposes, we are going to use the Reseal mode.
6.Selecting the MiniSetup option presents a short wizard for the user to fill out. Since we used Setup Manager to create a sysprep.inf answer file, we do not need to select this option.
7.We can use Pre-activated if we have already activated this copy of Windows XP Pro.
8.The NoSIDGen option does not generate a new SID for this copy of Windows. For imaging purposes, this is not a good option.
9.The Shutdown option is used to tell Sysprep what to do after it has finished resealing the computer – we want it to shutdown. At the next boot is when Sysprep will run and prepare the OS for use.
10.Click Reseal and Sysprep will perform its magic and shutdown the machine.
Sysprep Parameters
In Windows XP, you can use the following command line parameters with Sysprep:
•
-activated – Do not reset the grace period for Windows product activation. Use this parameter only if you have activated the Windows installation in the factory.
Important The product key that you use to activate the Windows installation must match the product key that is located on the COA sticker that is attached to that particular computer.
•
-audit – Restarts the computer in Factory mode without having to generate new security IDs (SIDs) or process any items in the [OEMRunOnce] section of the Winbom.ini file. Use this command-line parameter only if the computer is already in Factory mode.
•
-bmsd – Populates all the available mass storage devices in the [SysprepMassStorage] section.
•
-clean – Clears the critical devices database that is used by the [SysprepMassStorage] section in the Sysprep.inf file.
•
-factory – Restarts in a network-enabled state without displaying Windows Welcome or mini-Setup. This parameter is useful for updating drivers, running Plug and Play enumeration, installing programs, testing, configuring the computer with customer data, or making other configuration changes in your factory environment. For companies that use disk imaging (or cloning) software, Factory mode can reduce the number of images that are required.
When all the tasks in Factory mode are complete, run the Sysprep.exe file by using the -reseal parameter to prepare the computer for end-user delivery.
•
-forceshutdown – Shuts down the computer after the Sysprep.exe file finishes.
Note Use this parameter with computers that have an ACPI BIOS that do not shut down correctly with the default behavior of the Sysprep.exe file.
•
-mini – Configures Microsoft Windows XP Professional to use Mini-Setup instead of Windows Welcome. This parameter does not affect Microsoft Windows XP Home Edition, where the first-run experience is always Windows Welcome.
Note that if you plan to use the Sysprep.inf file to automate Mini-Setup, you must either run the Sysprep tool by using the -mini switch, or click to select the MiniSetup check box in the GUI interface. By default, if you do not choose to run Mini-Setup, Windows XP Professional runs the Windows Welcome.
•
-noreboot – Modifies registry entries (SID, OemDuplicatorString, and other registry entries) without the computer restarting or preparing for duplication. This parameter is mainly used for testing, specifically to see if the registry is modified correctly. Microsoft does not recommend this option because making changes to a computer after the Sysprep.exe file has run may invalidate the preparation that was completed by the Sysprep.exe file. Do not use this parameter in a production environment.
•
-nosidgen – Runs the Sysprep.exe file without generating new SIDs. You must use this parameter if you are not duplicating the computer where you are running the Sysprep.exe file or if you are preinstalling domain controllers.
•
-pnp – Runs the full Plug and Play device enumeration and installation of previous devices during Mini-Setup. This command-line parameter has no effect if the first-run experience is Windows Welcome.
Use the -pnp command-line parameter only when you must detect and install previous, non-Plug and Play devices. Do not use the sysprep -pnp command-line parameter on computers that only use Plug and Play devices. Otherwise, you will increase the time that it takes for the first-run experience without providing any additional benefit to the user.
Note When unsigned drivers are unavoidable, use the UpdateInstalledDrivers=yes parameter in conjunction with OemPnPDriversPath= and DriverSigningPolicy=ignore instead of the -pnp command-line parameter to provide a more seamless installation.
•
-quiet – Runs the Sysprep.exe file without displaying onscreen confirmation messages. This is useful if you are automating the Sysprep.exe file. For example, if you plan to run the Sysprep.exe file immediately after the unattended Setup program finishes, add the sysprep -quiet command to the [GuiRunOnce] section of the Unattend.txt file.
•
-reboot – Forces the computer to automatically restart, and then starts Windows Welcome Mini-Setup, or Factory mode, as specified. This is useful when you want to audit the computer and verify that the first-run experience is operating correctly.
•
-reseal – Clears the Event Viewer logs and prepares the computer for delivery to the customer. Windows Welcome or Mini-Setup is set to start the next time that the computer restarts. If you run the sysprep -factory command, you must seal the installation as the last step in your preinstallation process. To do this, run the sysprep -reseal command or click the Reseal button in the Sysprep dialog box.