Perform and troubleshoot an attended installation of Windows XP Professional.
There are two primary methods to perform an attended installation of Windows XP Professional: from a CD and over the network. We will review the setup process in the Installing from a CD section, and provides the steps necessary to install from a network share in the Installing Over the Network section.
Installing from a CD
Microsoft has improved some of the steps in setup from the Windows 2000 setup application, combining many of the questions into one step versus the old method which required you to be present for much of the attended installation process.
Though you may have had the fortunate experience of installing Windows XP Professional many times – when I was building images at a large corporation, I can’t tell you how many times I installed Windows XP, it was a lot – we are going to run through the process with some screenshots to refresh your memory, or provide you a first time experience if you are new to the process.
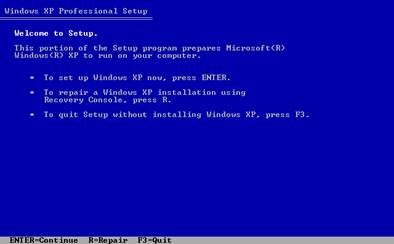
The first screen you arrive at in the setup process provides you a couple of options. If you are setting up a new installation of Windows XP Professional (which we are), you just press Enter to continue. If, however, you are repairing an installation of Windows XP, you could choose R at this screen to enter the recovery console. We will discuss the Recovery Console in detail later in this free course.
Press Enter to continue.
Next, you will be provided a copy of the license agreement. We chose to omit this screenshot as it was quite boring. Press F8 to agree and continue the setup process.
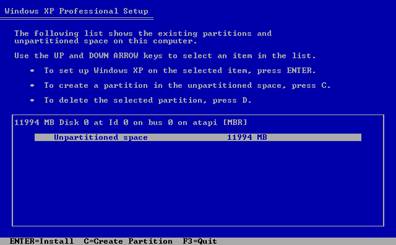
This screen shows the partitioned and unpartitioned space available on your computer. As you can see in the screenshot, we have a 12GB partition which is unformatted and unpartitioned. You could choose C to create a partition or D to delete a partition, but in this case, we are simply going to setup Windows XP on the selected partition, so you should press Enter.

Next, setup will have you format the hard drive. Normally, I would probably choose the first option, Format the partition using the NTFS fie system (Quick), however, for this tutorial, I selected the FAT file system in order to later show you how to convert from FAT to NTFS – you cannot convert NTFS to FAT.
The hard drive I selected is over 2 GB, so next, Setup alerts me that it is formatting the drive with the FAT32 file system. Press Enter to continue.

Now, sit back and relax as Setup copies a ton of files over to the hard drive to finish the install.
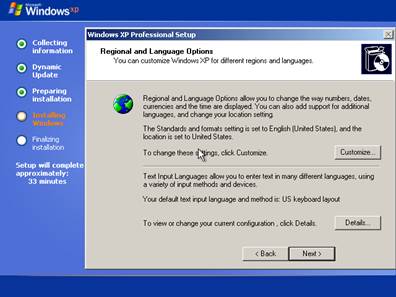
After the file copying has completed, the system will reboot and begin installing much of the Operating System. The next interactive opportunity you have with the system will be change any of the Regional and Language Options. Once you have changed any (if necessary), click Next to continue.
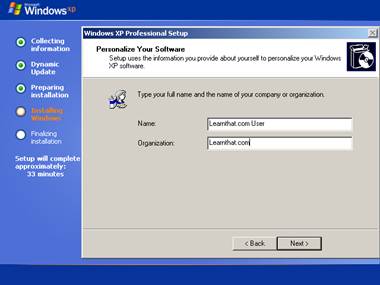
Next, you will enter your name and organization name and click Next.
Enter your product key on the next screen and click Next.
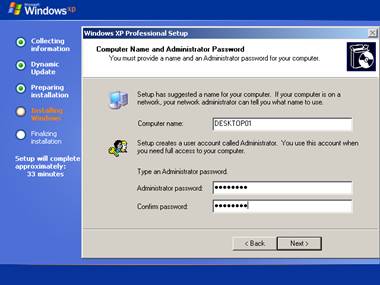
Enter the Computer Name and Administrator password next. The Computer Name is a unique NetBios Addressable name on the network. So, for example, you would not want two DESKTOP01s on the network. Click Next.

Next, you will change the Date and Time Settings to match your location (or more specifically, the location this particular machine will be deployed to). Click Next.
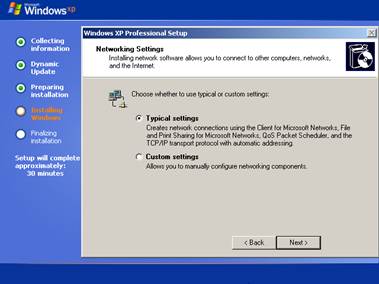
Change any networking settings, or just use the defaults and click Next.
On the next screen, you can either join a workgroup or join a domain. Often, when I build a machine, I do not join it to the domain at this point in case the computer name changes. I recommend joining a workgroup until a later time. Click Next.
Setup is complete, it will reboot when it is finished and open up the Windows environment. The first dialog box you will see is one which Windows notifies you it is changing the screen resolution. Click OK and Windows will load.
Installing Using a Floppy Drive
Microsoft eliminated the ability to create setup floppy disks with Windows XP. You are still required to have a CD-ROM drive, but if it is not bootable, you can still create a Windows 9x boot floppy.
Once you bootup into MS-DOS, simply run the WINNT.EXE file in the \i386 folder of the CD.
Installing Over the Network
Installing over the network looks similar to installing with a MS-DOS bootup floppy. Instead of running WINNT.EXE from the CD drive, you run it from a mapped network drive.
1.Create a distribution server with an accessible share containing the \i386 folder from the Windows XP setup CD-ROM. The share requires at least 1.5 GB with 100-200MB of space available for temporary files.
2.Create a network bootup disk which has the network drivers for the client system.
3.Boot up and connect to the network.
4.Format the target drive in FAT16 or FAT32 format to hold and decompress setup files.
5.Run \i386\winnt.exe from the distribution server share.
For more information about creating a network boot floppy, see this knowledge base item:
http://support.microsoft.com/support/kb/articles/Q142/8/57.ASP