Implementing Administrative Templates and Audit Policy
In this section, you will learn:
- Security in Windows Server 2003
- Using Security Templates to secure computers
- How to test computer security policy
- Configuring auditing
- Managing Security logs
- Managing Security settings
Security in Windows Server 2003
As you have learned so far, Windows Server 2003 has multiple areas of security you must review and configure to implement an effective security policy for your environment. You can setup security groups, access control, Group Policy, file/folder security, and delegate control.
Group Policy uses security policies and audit policies to help you secure and track security for your domain. You can create account policies and secure resources very granularly with Microsoft Windows Server 2003. In addition, you can create auditing which will allow you to track people as they connect to systems and resources. Every user or computer has a security identifier (SID) associated with it. If you were to create a new user JSmith, delete the account and create a new JSmith account, both accounts would have different SIDs as the SID is unique and non-repeating. This SID is used in Access Control Lists (ACL) to regulate access. The SID is the basis for security with Windows since the early days and continues today to be a primary foundation for how security functions within Windows.
Using Security Templates to Secure Computers
Security Templates are predefined templates Microsoft crea
ted for a variety of uses. The Security Templates are text based inf files setup to be imported into a Group Policy Object. As with any modifications to Group Policy, we recommend you create a new GPO to import security settings into versus using the default GPO. Once you have changed the default GPO, it is very difficult to change it back to its default state.
You can also modify security templates and create your own to decrease the time it takes to setup your Active Directory domain. Security templates include GPO settings for: Account Policies, Local Policies, Event Log, Restricted Groups, Registry, and File System. You are not able to predefine security for IP Security, Public Key, Software Restriction, or Wireless Network security settings.
There are eight predefined security templates located in %systemroot%\Security\Templates:
- Out of the box default security settings – Setup security.inf – the default security settings for a specific computer. Due to its size, you should not deploy this template via Group Policy.
- Compatible template – compatws.inf – this is a more lenient security template for workstations and servers. Default security settings allows members of the Users group to run applications that take part in the Windows Logo program for software, but not applications which are not certified. The Compatible template allows you to add users in the Users group versus the Power Users group as it relaxes the security requirements of the Users group and allows you to place users in this group.
- Default Domain Controller Security – DC security.inf – you can apply this template to servers if they are promoted from a member server to a domain controller.
- High Security Workstation – Hisecws.inf – this high security template assumes all of your clients are NT 4 service pack 4 and newer machines. Clients cannot connect to servers running NT 4 service pack 3 or older. Clients cannot connect to Windows 2000 or Windows NT 4 (SP 4) unless the clock of the workstation and server is within 30 minutes of each other. Clients cannot connect to Windows XP machines unless the clock of the target computer and the client are within 20 hours of each other. Hisecws.inf also uses Restricted Groups settings to remove members from the Power Users group and restrict members of the Administrators group. Only certified applications can run with this secure template in place.
- High Security Domain Controller – Hisecdc.inf – Secure template for domain controllers. All DCs must run Windows 2000 or newer.
- System Root Security Template – Rootsec.inf – applies the Windows XP root permissions to a drive.
- Secure Workstation – Securews.inf – includes security settings such as password, lockout, and audit settings.
- Secure Domain Controller – Securedc.inf – added security for domain controllers.
Managing, Changing, and Creating Security Templates
Microsoft created a Security Templates console for you to manage security templates. On the workstation or server you want to view the security template console:
- Open mmc.
- Click File, Add/Remove Snap-in.
- Click Add.

- Click Security Templates and click Add.
- Click Close.
- Click OK.
- If you are going to edit a security template, we recommend you make a copy of it. Right-click on the security template you want to use as a base and select Save As.

- In this example, we are going to start with the securews template and save it as CustomSecurity.
- Open the Account Policies and open Password Policy.

- On the right-hand side you will see the predefined policies. We are going to change the Enforce password history to “6 passwords remembered” and we are going to change the Maximum password age to “45 days”.
- Change any other settings you wish to.
- Right-click on your template and select Save to save it, or simple close it and it will display a Save dialog box.
Importing Security Templates into Group Policy Objects
You can import a security template into local or nonlocal GPO. If you want to import the template into group policy, open the console you use to edit GPO (gpedit.msc on the workstation or Group Policy Object Editor on the server):
- Navigate to Computer Configuration: Windows Settings: Security Settings.

- Right-click on Security Settings and select Import Policy.
- Choose the Security Template you wish to import and click Open.
- Your policy is now imported.
Some key things to keep in mind regarding security templates:
- Do not edit security templates directly. Always save security templates with a different name and make changes to the new templates.
- Do not edit the “Setup security.inf” template as it contains all the base security for a system.
- Do not apply the “Setup security.inf” template through Group Policy. It should only be applied through local group policy.
- Do not apply the Compatible template to domain controllers.
- Always test security changes to ensure you do not break any business applications prior to implementation in your production environment.
Configuring Auditing
Auditing allows you to track user and system activities in Microsoft Windows Server 2003. Auditing records events, or activities, in the security log on the server. Additionally, you can audit on a local workstation as well.
You can successes and failures in the security log. For example, if you log onto the domain, you can log that event. If someone tries to logon and fails, you can record the failure as well. This setup allows you to keep track of users and abuses over an extended period of time.
Event Properties

Each event displays several properties:
- Date
- Time
- Type – the type of event such as error, warning, information, success, or failure
- User – the user who performed the action
- Computer – the name of the computer where the event occurred
- Source – the software that logged the event
- Category – the category the event falls under
- Event ID
- Description – describes what even took place and any relevant information
Audit Policy
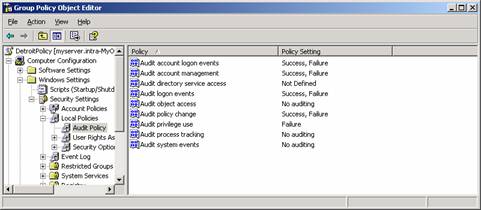
The audit policy is stored within the Group Policy Object. If you navigate to Computer Configuration: Windows Settings: Security Settings: Local Policies, you will find the nine items you can audit. These nine items correspond to the categories you will see when you review the security logs. These items are:
- Account logon
- Account management
- Directory service access
- Logon events
- Object access
- Policy change
- Privilege use
- Process tracking
- System events
Audit Categories
Account Logon: a domain controller received a request to authenticate a user account
Account management: tracks changes to user accounts. Records when an account is created, changed, delete, renamed, disabled, enabled, or password was set or changed. Records when a group is created, changed, or deleted.
Directory service access: a user accesses an Active Directory object. You must configure specific AD objects to log this type of event.
Logon events: creates entries when a user logs on or logs off. Also creates entries when a user makes or cancels a network connection to the computer (or server).
Object access: logs when a user accesses a file, folder, or printer. You must configure specific files, folders, or printers for auditing.
Policy change: a change was made to the user security options, user rights, or audit policies.
Privilege use: creates entries when a user exercises a right.
Process tracking: tracks when a program performs an action. Typically used by programmers for troubleshooting as it creates a large number of events in the security logs.
System events: a user restarts or shuts down the computer. Also records any events affecting the security logs.
Setting up Auditing
The first step in setting up auditing is determining which of the categories you want to audit for successes, failures, or both. Once you have determined your audit requirements, take these steps to configure auditing:
- Open the Group Policy Object Editor for the Group Policy you want to change.
- Navigate to Computer Configuration: Windows Settings: Security Settings: Local Policies.
- Double-click the audit policy setting you want to change.

- You have several options. You can leave the option undefined, you can define it and check neither box, or you can define the option and check one or the other box, or both. Once you have changed the setting, click OK.
- Change each of the settings required.
Auditing Active Directory Objects
You may require that Active Directory Objects be audited. To audit these objects:
- Open Active Directory Users and Computers.
- Select the object you want to audit. In our example, we are going to choose the Detroit Organizational Unit.
- Right-click on the object and select Properties.
- Click on the Security tab.
- Click the Advanced button.

- Click on the Auditing tab.
- Click on the Add button.
- Enter the name of the group you wish to audit and click OK.

- Select the options you wish to audit. Select Successful or Failed or both to audit those items.
- Click OK when you have selected all of the items you wish to audit.
- Click OK to close the Advanced window.
- Click OK to close the Properties window.
Auditing is now configured for the objects you selected. In our example, we are auditing when a member of PCSupport creates an account. We created a test account, and saw this entry appear in our Security log:

Auditing Files and Folders
In addition to Active Directory Objects, you can also audit drives, files, and folders.
You may have very sensitive folders for groups like Legal or HR that you need to track when certain events occur. To setup auditing on a file or folder:
- Navigate to the folder you need to audit. Right-click on the folder and select Properties.
- Click on the Security tab.
- Click on Advanced.
- Click on the Auditing tab.
- Click Add to add a group or user to audit.

- Select the Access items you wish to audit.
- Click OK.
- Click OK to close the Advanced Security Settings window.
- Click OK to close the Properties window.
If you have “Audit object access” turned on in your Audit policy, you will now see entries in your Security Log when individuals in the groups you selected perform tasks you are auditing.
Auditing is a great tool to track security events on your network and servers.
Managing Security Logs
There are several ways you can open the Event Viewer. The easiest is to open it through the Administrative Tools submenu in the Start menu.
When you open the Event Viewer, you will see all of the logs available on the machine. Double-click on the Security log to view the entries.
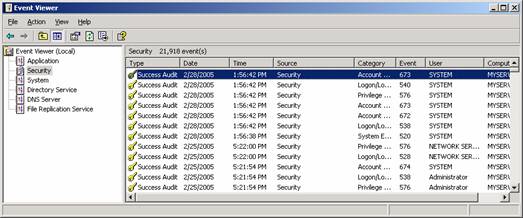
You can view any of the entries by double-clicking on the entry.
Changing Log Settings
Each log has its own configuration properties you may wish to change. Right-click on the Security log in the left portion of the Event Viewer and select Properties.

You will see the options available to change. The maximum size of the log, what to do when it reaches the maximum size, and “Clear Log” are some of the options you can change on this screen. The defaults are typically adequate for most needs.

If you click on the Filter tab at the top, you can enter a term to filter the log on. This allows you to see the events for a particular category or user, as an example. As your security log grows, filtering it will become handy.
Additionally, you can set log settings through Group Policy Objects. Open Group Policy Object Editor and navigate to Computer Configuration: Windows Settings: Security Settings: Event Log. There are twelve options you can set there.
Managing Security Settings
We discussed some of the security changes you can set in our earlier Group Policy tutorials. Developing a security policy for your organization is an essential task for a network administrator. You must balance the needs of the business and of the security requirements for your organization. Described another way – if you’re too restrictive you might lose money or business, if you’re too loose you might lose essential data or trade secrets. Balancing these needs requires communication with the business units and their management team to ensure the policy you develop has buy-in from the top down in the organization.
We have already discu
ssed setting Audit Policies. Let’s review some of the other popular security options you can set in Group Policy:
1. Password Policy
Open Group Policy Object Editor and navigate to Computer Configuration: Windows Settings: Security Settings: Account Policies: Password Policy. There are six options you can define:
a. Enforce password history – keeps track of a specified number of passwords and does not allow users to repeat passwords within that list.
b. Maximum password age – the maximum amount of time a password can be kept. Once this password age is met, the user is required to change their password.
c. Minimum password age – the minimum amount of time a user is required to retain the same password. Some organizations set this to 1 day to require users to retain their password for at least one day.
d. Password must meet complexity requirements – a user’s password must meet 3 of 4 requirements for security. The password must contain at least three of: lower case letters, upper case letters, numbers, special characters (e.g. #&@%$^).
e. Store passwords using reversible encryption – stores passwords in the equivalent of plaintext. Provides support for IIS Digest Authentication or applications which require knowledge of a user’s password. By default, this setting is off.
2. Account Lockout Policy
Navigate to Computer Configuration: Windows Settings: Security Settings: Account Policies: Account Lockout Policy.
a. Account lockout duration – the length of time the account is locked out if a user does not enter the correct password a number of defined times.
b. Account lockout threshold – the number of times a user can enter an incorrect password before the system locks their account. If you set this policy, Account lockout duration and Reset account lockout counter after both get set automatically.
c. Reset account lockout counter after – resets the counter for lockouts after a predetermined time. For example, if you enter the wrong password twice, the counter is at 2. If you set this value to 30 minutes, 30 minutes after the last time you entered the wrong password, the counter will be reset to zero.
3. User Rights Assignment
Navigate to Computer Configuration: Windows Settings: Security Settings: Local Policies: User Rights Assignment. This section allows you to grant or deny a number of user rights.
4. Security Options
Navigate to Computer Configuration: Windows Settings: Security Settings: Local Policies: Security Options. This section allows you to grant or deny a number of security options to certain users or groups.