Managing Your Customer Information
The Customer List lists all the customers you’ve entered for your company. From here, you can add, edit and delete customer information, add jobs for a customer, create invoices, receive payments and run customer-related reports.
To open the Customer List, click the Cust ![]() button on the QuickBooks toolbar, or select Customer:Job List from the Lists menu. You can also access the Customer List by clicking the Customers icon in the Customer Navigator.
button on the QuickBooks toolbar, or select Customer:Job List from the Lists menu. You can also access the Customer List by clicking the Customers icon in the Customer Navigator.
The Customer List opens in a new window:

Double-clicking any customer name in the list opens the Customer window, where you can view and enter detailed information for that customer.
The buttons at the bottom of the window contain commands for accomplishing customer-level tasks, such as entering customer information, adding jobs, creating invoices and running customer reports.
![]()
Adding Customers
To add a new customer:
- On the QuickBooks toolbar, click the Cust button, or select Customer:Job List from the Lists menu.
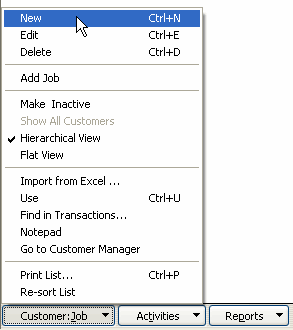
- At the bottom of the Customer List, click the Customer:Job button and select New from the menu that appears:

The New Customer window opens.

- Enter the name of the customer as you want it to appear in the Customer List (for example, Smith, Jane).
- If the customer has an outstanding balance, enter the balance and the date the balance reflects.
Note: If you are going to track jobs for the customer, don’t enter an opening balance; QuickBooks will calculate this for you.
- The tabs on the window provide fields for entering detailed information for the customer, such as address information, payment terms, payment methods, and job information. Select each tab and complete the fields as appropriate. All this information is optional.
Note: To enter a billing address for the customer, click the Address Details button under the Bill To box. Complete the address fields in the window that opens and click OK. You can then click the >>Copy>> button to copy the address to the Ship To box, or you can click the Address Details button under the Ship To box to enter a different shipping address.
- Click OK to save the customer information, or Next to save the customer information and add a new customer.
Adding Jobs for a Customer
To add a job for an existing customer:
- In the Customer List, highlight the customer.
- Click the Customer:Job button and select Add Job from the menu.
The New Job window opens.

- Enter a name for the job.
- If necessary, make changes to the customer address and payment information.
- Select the Job Info tab.

- Select the job status and enter a start date and projected end date for the job. Leave the end date blank until you’ve finished the job.
- Enter a job description.
- Select a job type from the drop-down menu, or select <Add New> to define a new job type.
If you selected a new job type, complete the job type fields in the window that appears and click OK.
- Click OK to save the job, or Next to save the job and add a new one.
Editing Customer Information
To edit customer information:
- In the Customer List, double-click the customer’s name.
- In the Edit Customer window, make your changes as necessary and click OK.
To adjust a customer’s opening balance:
- In the Customer List, click the Activities button and select Use Register.
- Select the customer’s opening balance transaction, if you entered one. Otherwise, select the first of any individual transactions you need to adjust.
- Click inside the Amt Chrg column for the transaction and change the amount. Do the same for any additional transactions you need to change.
- Click the Record button, or press Enter.
- To close the register, click the close button
 in the upper right-hand corner of the window.
Updating Customer Jobs
QuickBooks does not automatically update job status or completion dates. To change the status of a job, or to enter an end date:
- In the Customer List, double-click the job under the customer’s name, or double-click the customer’s name and, in the Edit Customer window, select the Job Info tab.
- Make your changes as necessary and click OK.

