Getting Started with QuickBooks
In this section, you will learn how to:
- Setup Quickbooks for your company
- Convert data from Quicken
- Create a new company file
Understanding QuickBooks Accounting
QuickBooks automates double-entry accounting, tracking transactions throughout the accounting cycle from creating purchase orders and receiving items to selling goods and services and depositing payments.
QuickBooks uses accounts to group financial data by purpose. Balance sheet accounts track assets and liabilities: asset accounts track what your company owns, including cash, inventory, equipment, buildings and money owed by your customers; and liability accounts track your company’s debts, including loans, credit card debt, taxes and accounts payable-what you owe vendors. Equity accounts track earnings retained for business growth and investment into the company by its owners. As you enter purchase orders, bills, invoices and payments into QuickBooks, you associate each of these with a particular asset, liability or equity account.
This is the fundamental basis for QuickBooks’ automated balance sheet accounting process. A balance sheet describes the financial health of your company and is calculated based on the simple formula: Assets=Liabilities+Equity. Much of QuickBooks’ power comes from its ability to track complex, inter-related transactions as they contribute to this formula. As long as you keep complete records and associate the transactions you enter with the appropriate accounts, QuickBooks will handle much of the complexity of business accounting for you.
This section will teach you how to setup your business in Quickbooks. This is a long section as it walks through the setup process teaching you what you need to know.
Setting Up Your Business in QuickBooks
To create a new company file, open the File menu and select New company. This starts the EasyStep Interview, which guides you through the process of creating your company database:

The setup process is divided into five stages, which are represented by tabs at the right of the interview screen. Each of these tabs is further divided into several sections, represented by tabs at the top of the screen. As you complete each stage of the interview a checkmark will appear on the appropriate tab.
Use the Next and Prev (Previous) buttons to move forward and backward through the interview. You can move backward to make changes to information you’ve already entered.
To begin the interview, click Next, and then click Next again.
Converting Existing Data from Quicken

If you’re currently using Quicken to maintain your company records, you can convert the data file to QuickBooks:
- Click the Convert Quicken Data button.
- In the dialog box that appears, click Convert.
- In the Convert a Quicken file dialog box, browse to the location of your existing Quicken data file and click Open.
QuickBooks converts the data and prompts you to save your new QuickBooks file.
- In the Create a new QuickBooks for Windows file dialog box, browse to the location where you want to save the file and click Save.
- QuickBooks then prompts you to select the accounts you use for Accounts Receivable:
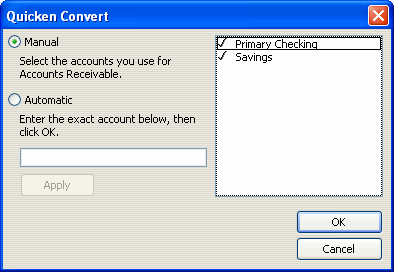
- Click on each account you want to use. Selected accounts are indicated with checkmarks.
- Click OK.
- If prompted to convert online data, click Yes.
- If necessary, continue to click OK until the main QuickBooks interface appears. At this point, you may need to enter additional information about your company. To do so, you can either enter the information manually or complete the EasyStep Interview:
- To enter your company information manually, select Company Information from the Company menu.
- To complete the EasyStep Interview, select EasyStep Interview from the File menu. When the EasyStep Interview screen opens, click Next until you reach the Company Information tab.
