Recording Sales
You can use two methods to track sales to customers, depending on when the customer pays you: invoices let you record sales when the customer isn’t paying in full (or is paying in advance), while sales receipts record sales paid for in full at the time the goods or services were provided.
The Customer Navigator displays the workflow for recording sales, with shortcuts for creating invoices and sales receipts, receiving payments and making deposits:
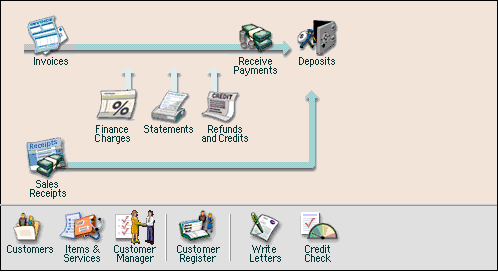
You can click any of these icons to accomplish the related task.
Creating an Invoice
Use invoices to track what customers owe you for goods and services, when they don’t pay in full at the time of the sale, or when they pay in advance.
To create an invoice:
- Click the Invoice
 button on the QuickBooks toolbar, or select Create Invoices from the Customers menu.
 - If QuickBooks asks if you want help selecting an invoice format, click No; this simply opens a checklist to help you determine whether to use invoices, sales receipts or statements.
The Create Invoices window opens.
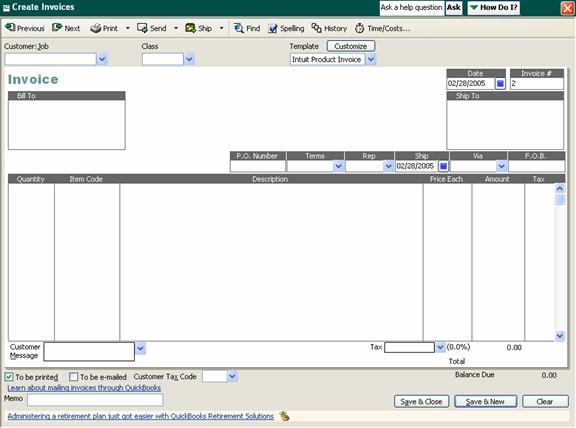
- Select the name of the customer and/or job from the drop-down menu.
- If the customer currently has outstanding billable costs, QuickBooks notifies you that this information is available:
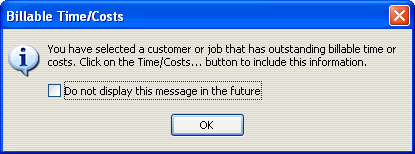
Click OK.
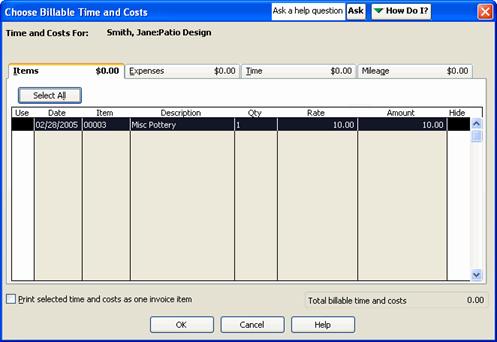
- If the customer has outstanding billable costs, click the Time/Costs button at the top of the invoice window to open the Choose Billable Time and Costs window:
-
- Review the items and expenses shown in the window by selecting the appropriate tabs.
- Click inside the Use column for each item and expense to include in the invoice.
- Click OK.
QuickBooks adds these items and expenses to the invoice. You can edit them as necessary.
- Select the class associated with the invoice, if applicable.
- Select an invoice template.
- For each item you need to add to the invoice, select the item from the drop-down menu in the Item Code column.
- Enter a quantity and adjust the price, if necessary.
- Confirm that the appropriate tax entry appears in the Tax column. If the item is non-taxable, select Non from the drop-down menu.
- Review the remainder of the fields, completing them as necessary. The Memo field is for your own use; any entry you make will not appear on the invoice you send to the customer, but it will appear in sales reports and on reminder statements.
- To print the invoice, click the Print button at the top of the window. Confirm the printer settings and click Print.
To print multiple invoices, click the down arrow on the Print button and select Print Batch. In the window that opens, select the invoices you want to print and click OK.
Alternatively, you can click the Send ![]() button to e-mail the invoice to the customer. In the window that opens, confirm the e-mail addresses being used and the body of the message, and then click Send Now (or Send Later, if you want to wait and e-mail several invoices at once). The invoice will be attached to the e-mail as a PDF file.
button to e-mail the invoice to the customer. In the window that opens, confirm the e-mail addresses being used and the body of the message, and then click Send Now (or Send Later, if you want to wait and e-mail several invoices at once). The invoice will be attached to the e-mail as a PDF file.
- Click the Save & Close button to save the invoice, or Save & New to save the invoice and add another one.
Receiving an Invoice Payment
Once you receive payment for an invoice, you need to apply the payment to the invoice:
- In the Customer Navigator, click the Receive Payments icon, or select Receive Payments from the Customers menu.
The Receive Payments window opens.
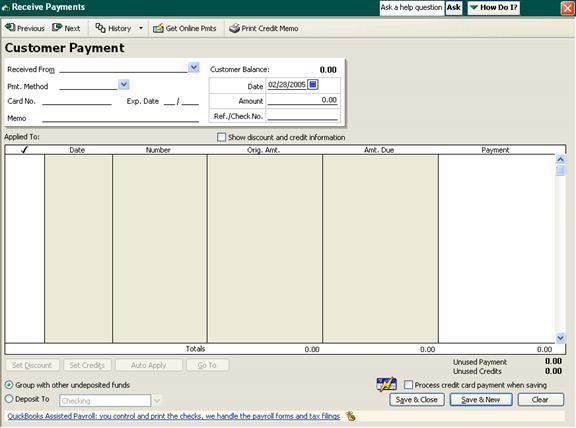
- Select the customer and/or job from the Received From drop-down menu.
QuickBooks automatically adds the outstanding charges from open invoices to the payment form.
- Enter the amount of the payment you received and complete the payment method fields.
- To apply the payment, click inside the first (checkmark) column for each of the line items to which you want to apply the payment. QuickBooks tracks the unused portion of the payment at the bottom right of the window.
To have QuickBooks automatically distribute the payment, click the Auto Apply button at the bottom of the window. QuickBooks automatically applies the payment to the oldest invoices first.
- If you want to wait to deposit the payment with other undeposited funds, select the Group with other undeposited funds option at the bottom of the window; otherwise, select the Deposit To option and the account that should receive the payment.
- Click Save & Close to save the payment, or Save & New to save the payment and add another one.
Creating a Sales Receipt
When you receive full payment from a customer at the time of sale, you should create a sales receipt instead of an invoice:
- In the Customer Navigator, click the Sales Receipts icon, or select Enter Sales Receipts from the Customers menu.
The Enter Sales Receipts window opens.
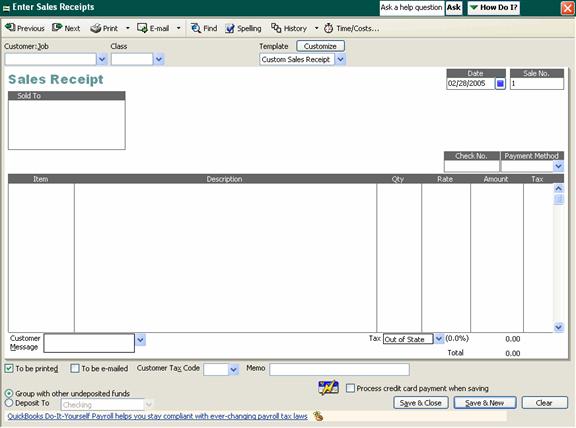
- Select the name of the customer and/or job from the drop-down menu.
- Select the class associated with the sale, if applicable.
- Select receipt template.
- Select the payment method from the drop-down menu.
- For each item you need to add to the receipt, select the item from the drop-down menu in the Item column.
- Enter a quantity and adjust the rate, if necessary.
- Confirm that the appropriate tax entry appears in the Tax column. If the item is non-taxable, select Non from the drop-down menu.
- Review the remainder of the fields, completing them as necessary. The Memo field is for your own use; any entry you make will not appear on the sales receipt.
- To print the receipt, click the Print button at the top of the window. Confirm the printer settings and click Print.
To print multiple receipts, click the down arrow on the Print button and select Print Batch. In the window that opens, select the receipts you want to print and click OK.
Alternatively, you can click the Send ![]() button to e-mail the receipt to the customer. In the window that opens, confirm the e-mail addresses being used and the body of the message, and then click Send Now (or Send Later, if you want to wait and e-mail several receipts at once). The receipt will be attached to the e-mail as a PDF file.
button to e-mail the receipt to the customer. In the window that opens, confirm the e-mail addresses being used and the body of the message, and then click Send Now (or Send Later, if you want to wait and e-mail several receipts at once). The receipt will be attached to the e-mail as a PDF file.
- If you want to wait to deposit the payment with other undeposited funds, select the Group with other undeposited funds option at the bottom of the window; otherwise, select the Deposit To option and the account that should receive the payment.
- Click the Save & Close button to save the receipt, or Save & New to save the receipt and add another one.
Creating Statements
You can create statements for customers showing outstanding balances and the length of time the balances have been outstanding:
- In the Customer Navigator, click the Statements icon, or select Create Statements from the Customers menu.
The Create Statements window opens.
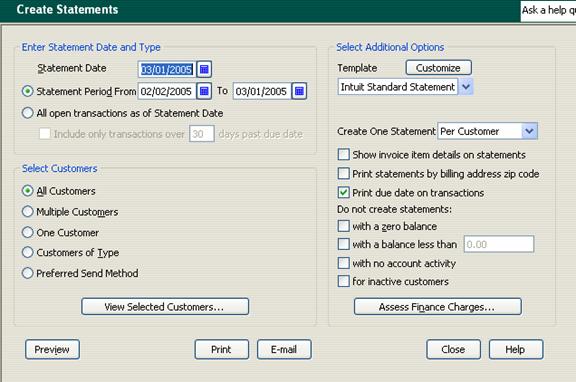
- If necessary, select the accounts receivable account from which to print statements.
- Confirm the statement date. This will appear at the top of the statements as the Billed Date, and affects the date due.
- Select whether to create statements for transactions within a particular date range or all open transactions.
- Select whether to print statements for all customers, multiple customers or one customer. Each of these options, with the exception of All Customers, provides a button or drop-down menu that lets you select the customers (or type of customers) to include. Make this selection as necessary.
- Select a template to use for the statements. You can customize the template as necessary by clicking the Customize button.
- To create a separate statement for each customer job, select Per Job from the Create One Statement drop-down menu; otherwise, select Per Customer.
- The remainder of the checkboxes let you select additional options. Check or clear these boxes as necessary.
- To add finance charges, click the Assess Finance Charges button.
- If prompted, click Yes to set up finance charges.
- In the Preferences window, select the options to use for assessing finance charges, including the annual interest rate and grace period, and then click OK.
- In the Assess Finance Charges window, select the customers to whom the finance charges should be applied.
- Click Assess Charges.
QuickBooks returns to the Create Statements window.
- Click Preview to preview the statements, and then click Print to print the statements, or E-mail to e-mail the statements to customers.
Depositing Payments
You can deposit individual payments at the time you enter an invoice payment or a sales receipt, or you can wait and deposit multiple payments at once. When you’re ready to deposit a payment or payments:
- Click the Deposit icon in the Banking Navigator, or select Make Deposits from the Banking menu.
If there are currently undeposited funds from invoice payments or sales receipts, the Payments to Deposit window opens.
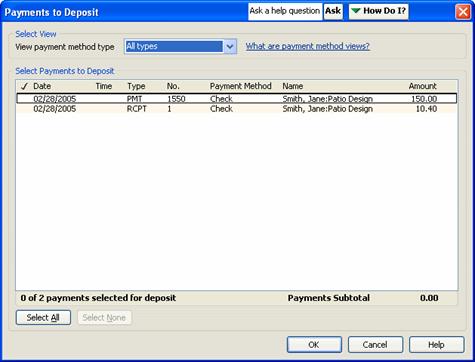
- Select the payments you want to deposit and click OK. If you don’t want to deposit any of the payments, leave all the items unselected and click OK.
If you selected payments to deposit, the Make Deposits window opens.

- Select the account the funds should be deposited into.
- Confirm the date and the entry in the Memo field, making changes as necessary.
- Enter any additional deposits as new line items. You can enter cash deposits separately for bookkeeping purposes; QuickBooks will total these and enter a single amount on the deposit slip.
Note: If you’re entering a credit card payment, enter any fees you’re charged as separate line items and associate them with an expense account. You cannot enter credit card payments on printable deposit slips.
- If you want to get cash back, select an account and enter the amount at the bottom of the window.
- To print the deposit slip or a deposit summary, click the Print button at the top of the window. Select whether to print the deposit slip and a summary or a deposit summary only. Then confirm the printer settings and click Print.
- Click Save & Close to save the deposit or Save & New to save the deposit and add another one.