Managing Your Vendor Information
Vendors include any businesses, tax agencies and individuals with whom you do business. The Vendor List lists all the vendors you’ve entered for your company. From here, you can add, edit and delete vendor information, create purchase orders, pay bills and run vendor-related reports.
To open the Vendor List, click the Vend ![]() button on the QuickBooks toolbar, or select Vendor List from the Lists menu. You can also access the Vendor List by clicking the Vendors icon in the Vendors Navigator.
button on the QuickBooks toolbar, or select Vendor List from the Lists menu. You can also access the Vendor List by clicking the Vendors icon in the Vendors Navigator.
The Vendor List opens in a new window:

Double-clicking any vendor name in the list opens the Vendor window, where you can view and enter detailed information for that vendor.
The buttons at the bottom of the window contain commands for accomplishing vendor-level tasks, such as entering vendor information, creating purchase orders and running vendor reports.
![]()
Adding Vendors
To add a new vendor:
- On the QuickBooks toolbar, click the Vend button, or select Vendor List from the Lists menu.
- At the bottom of the Vendor List, click the Vendor button and select New from the menu that appears:

The New Vendor window opens.
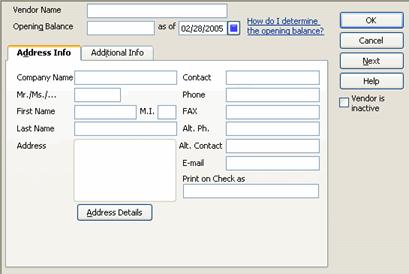
- Enter the name of the vendor as you want it to appear in the Vendor List (for example, Smith, Jane).
Note: The same name cannot appear in more than one QuickBooks list. If the vendor you’re adding is also a customer, you’ll have to vary the name slightly; for example, you can add the word vendor to the end of the name. In forms and on checks, QuickBooks will use the name you enter into the Print on Check as field.
- If you have an outstanding balance with this vendor, enter the balance and the date the balance reflects.
- The tabs on the window provide fields for entering detailed information, such as the vendor’s contact information, your account number and your credit limit with the vendor. Select each tab and complete the fields as appropriate. All this information is optional.
To enter the vendor’s address, click the Address Details button and complete the fields in the window that opens. Click OK to save the address and close the window.
- Click OK to save the information, or Next to save the information and add a new vendor.
Editing Vendor Information
To edit vendor information:
- In the Vendor List, double-click the vendor’s name.
- In the Edit Vendor window, make your changes as necessary and click OK.
To adjust your opening balance with the vendor:
- Open the Chart of Accounts by clicking the Accnt button on the QuickBooks toolbar or selecting Chart of Accounts from the Lists menu.
- In the Chart of Accounts, highlight Accounts Payable.
- Click the Activities button and select Use Register.
- In the register, select the vendor’s opening balance transaction and change the amount in the Billed column.
- Click the Record button, or press Enter.
- To close the register, click the close button
 in the upper right-hand corner of the window.