Setting Up Your Company
Using the New Company Setup Wizard
The new company setup wizard guides customers through the process of setting up a new company in the Peachtree Accounting system. In order to setup a new company:
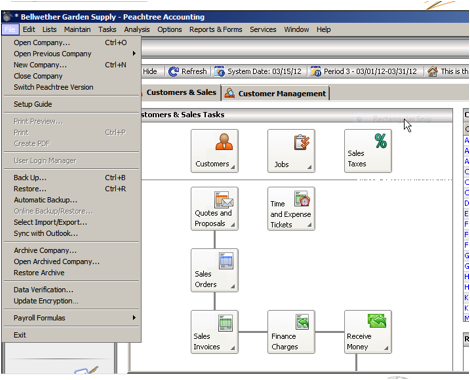
Begin by clicking on <File> from the main page. Choose new company. Review the list of information required to setup a new company. Please note that to setup a new company, users need the company name and address, business type, accounting type, accounting periods, and fiscal year.
Click <Next>
Enter the company information. Note that an asterisk denotes a required field.

Click <Next>
Choose a method for generating the new company. Users may use a sample business, copy settings from an existing entry, convert from another program, build a new chart, or consolidate companies.
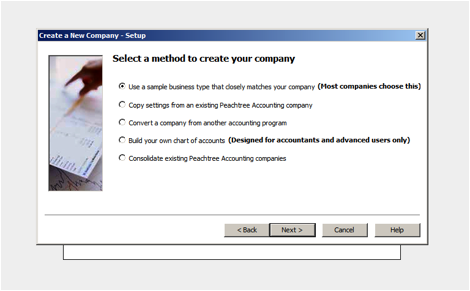
Click <Next>
Selecting a Chart of Accounts
Users who choose to add a new entry using a sample or existing business will be asked to select a chart of accounts. Select the option that most closely fits the type of transaction to be tracked for the new company.
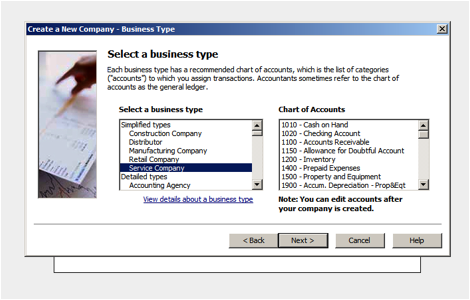
<Click Next>
Selecting the Accounting Method
On the “Choose an Accounting Method” screen, users are asked to identify whether the new account type is an “accrual” or a “cash” account. “Accrual” is the most common method and simply tracks all transactions with a company, whether or not expenditures are immediately settled. The cash option only records income when it’s actually received. Note that after the accounting method field is selected, it cannot be changed, so it’ important to select the correct accounting method when creating a new entry.

Once an accounting method has been chosen, click <Next>.
Selecting a Posting Method
Users will next be asked to choose a way to record transactions. Most companies choose to record individual transactions as they occur. For accuracy purposes, however, some companies choose to batch their transactions. This simply saves individual transactions until they can be reviewed and posted in groups. The posting method is alterable, so choosing one method does not preclude users from later switching to the other.

Click <Next>.
Selecting Accounting Periods
Next, users will choose how to record fiscal periods. For companies that settle accounts at regular monthly intervals, the 12 month period is the most common selection. Some companies, however, follow irregular billing cycles. For this type of period, choose the second option.

Click <Next>.
Users who select the 12 monthly periods option will then be asked to choose the first billing cycle of the year. Note that this field cannot be altered after it’s selected, so it’s important to choose the correct month for the first billing cycle of your company’s fiscal calendar.
Users who choose the second option will be taken to a screen on which they specify the amount of billing cycles for the calendar year and choose a start date. Note that this field cannot be altered after it’s selected, so it’s important to choose the correct month for the first billing cycle of your company’s fiscal calendar.

Click <Next>.
You will then be prompted to finish creating your company.
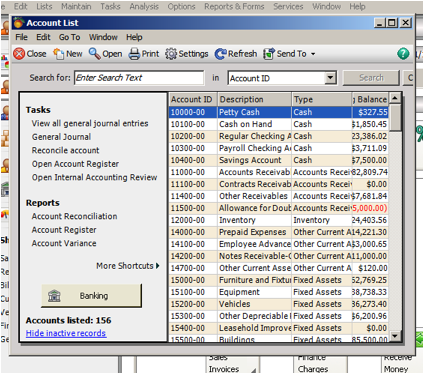
Modifying the Chart of Accounts
From the primary menu, choose <File>, <Setup Guide>, and then <Chart of Accounts>. A popup window will ask you to either add new accounts or click <Next>.

Next, you will be asked to enter new account balances or to skip that step for now. If you choose to enter the new account balances, you will also be asked to enter the accounting period.
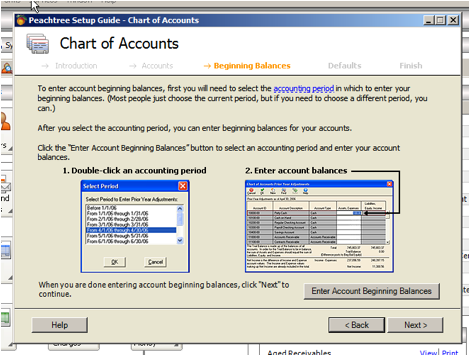
Click <Next>
You will next be asked to accept or change the default display settings.

Click <Next>
You will then be given the option to enter the security setup. If you choose to enter the security setup, you will be asked to confirm that you wish to enter the user security setup.

Click <Next>
You will be provided with a list of additional options for modifying the chart of accounts.
To modify an existing chart of accounts:
Select “Lists” from the primary menu in the top left side of the screen. Click <Chart of Accounts> on the dropdown menu. Click <Settings> in the upper left side of the screen just under the primary menu or select “Edit” and then choose <Settings> from the dropdown menu. From there you will be able to add to remove fields from the Chart of Accounts.
To change the defaults for a chart of accounts:
Choose <Set Up Defaults> from the dropdown menu under “Chart of Accounts” in the “Banking Tasks” pane. A popup will appear and you will be able to select your defaults. When you are finished, click <Ok>.
