Quick Tabs
The easiest way to set tabs in Microsoft Word is to use the horizontal ruler. In the left corner, click the ![]() to select the alignment (left
to select the alignment (left ![]() , center
, center ![]() , right
, right ![]() , decimal
, decimal ![]() , or bar
, or bar ![]() ), and then click the ruler in the location where you want to set the tab.
), and then click the ruler in the location where you want to set the tab.
![]()
You can move the location of tabs simply by dragging and dropping the tabs on the ruler. To remove a tab, drag it off the ruler.
The tabs you set apply only to the current (or selected) paragraph(s).
Set Tabs
To set additional options for tabs, such as defining a leader style, open the Format menu and select Tabs. This opens the Tabs dialog.
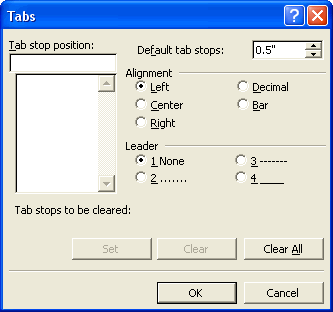
For each tab you want to set:
- Enter the precise measurement, in inches, into the Top stop position field.
- Select the alignment.
- Select the leader style, if appropriate.
- Click Set.
To clear a tab, select it from the list and click Clear, or click Clear All to clear all tabs from the list.
Use Section Breaks
Use section breaks to divide the formatting of your document into sections. Each section can use a different page layout, size, and orientation, as well as different headers and footers, to name just a few examples.
To insert a section break:
- Position the insertion point where you want to insert the section break.
- Open the Insert menu and select Break.
The Break dialog opens.
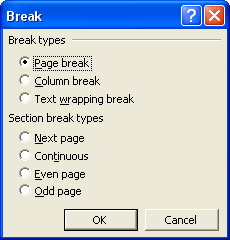
- Select the break type, and then the section break type. The section break type tells Word where to begin the new section (for example, on a new page, or on the same page).
- Click OK.
To delete a section break, just highlight it and press Delete on your keyboard. (If you don’t see the section break, click Show/Hide ![]() on the Standard toolbar.) Be aware that when you delete a section break, you delete all the formatting for the preceding section.
on the Standard toolbar.) Be aware that when you delete a section break, you delete all the formatting for the preceding section.
Types of Section Breaks
Word provides several types of section breaks, all of which are displayed in the Break dialog box. (Open the dialog by selecting Break from the Insert menu.)
- Next page starts a new section on the next page.
- Continuous starts a new section on the same page, where you insert the break.
- Odd page and Even page start a new section on the next odd- or even-numbered page. If the preceding section ends on a page of the same number type (odd or even), then Word inserts a blank page. The blank page is not displayed on-screen, but it is included when the document is printed. This is a handy way to create divisions when, for example, you want the first page of each chapter in a document to begin on an odd page.
If you need to, you can change the type of an existing section break:
- Position the insertion point inside the section whose type you want to change.
- Open the File menu and select Page Setup.
- In the Page Setup dialog, click the Layout tab.
- From the Section start menu, select the section break type.
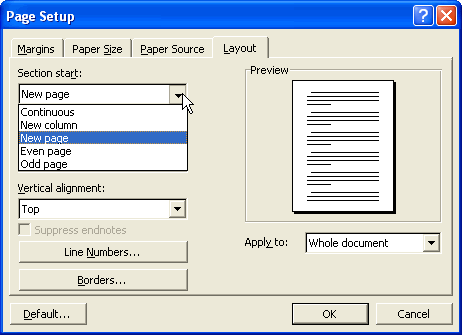
- Click OK.