Using Page Setup in Microsoft Word
Use Word’s Page Setup dialog to define the layout for your page. From the File menu, select Page Setup.

The Page Setup dialog has 4 tabs:
- Margins – Lets you define the margins for your page, including the placement of the header and footer in relation to the edge of the page.
- Paper Size – Lets you specify the paper size and orientation (portrait or landscape).
- Paper Source – Lets you specify a different paper source for a part of your document (for example, if you want to print a cover page on special paper).
- Layout – Lets you add line numbers and borders, as well as specify additional options for headers and footers.
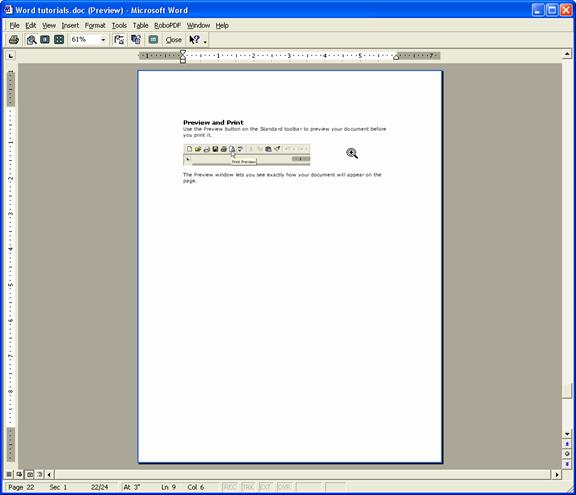
Preview and Print
Use the Print Preview button on the Standard toolbar (or select Print Preview from the File menu) to preview your document before you print it.

The Preview window lets you see exactly how your document will appear on the page.
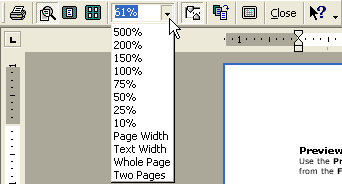
Notice that the pointer appears as a magnifying glass with a plus sign in the middle. Click the mouse to zoom in on the document. Click again to zoom back out.
You can also zoom in and out by specifying a value in the Zoom box on the toolbar.
To view several pages at once, click the Multiple Pages button on the toolbar, then select a layout from the menu.
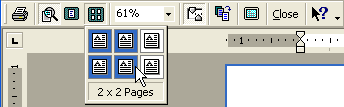
Use the One Page button to change the view back to one page.
![]() To print your document from the Preview window, simply click the Print button on the toolbar.
To print your document from the Preview window, simply click the Print button on the toolbar.
Or, to return to the document without printing, click the Close button.
To print your document without previewing:
- Open the File menu and select Print (or press Ctrl+p).
The Print dialog opens.
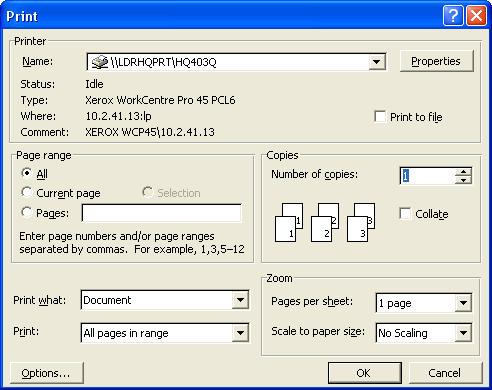
- Make sure the correct printer is selected in the Name field.
![]() Tip:
Tip:
The Properties button lets you specify additional options specific to your printer. These include paper type, collating and hole punching, and color settings.
- Select the page range. To print a specific page range, select the Pages option and enter the beginning and ending page numbers separated by a hyphen (for example, 5-20).
- Enter the number of copies.
- Click OK.
Microsoft Word prints your document using the selected printer.
![]() Tip:
Tip:
![]() Click the Print button on the Standard toolbar to print a document using the default settings. Word will send the document to your default printer without opening the Print dialog.
Click the Print button on the Standard toolbar to print a document using the default settings. Word will send the document to your default printer without opening the Print dialog.
Change Document Views
Microsoft Word provides 4 document views, which you can choose from the View menu:
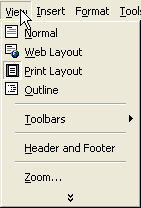
- Normal view displays the text and objects you insert, as well as page and section breaks, and natural page breaks (indicated by dotted lines). However, the layout of the page is not displayed—page numbers are not shown, for example, and any text-wrapping you’ve applied to objects does not appear.
- Web Layout view displays the document as a web page, including any graphics, text-wrapping, and backgrounds you’ve applied.
- Print Layout view displays the document as it will be printed. Each page is shown in its entirety, including any white space at the bottom, as well as headers and footers, page numbers, and text-wrapping.
- Outline view displays the structure of the document, allowing you to reorganize text by dragging and dropping headings. You can collapse and expand the document depending on whether you want to view only headings or all the text.
The View Buttons
To quickly change between document views in Word, use the View buttons at the bottom left corner of the window:
- Click
 to switch to Normal view.
 - Click to switch to Web Layout view.
- Click to switch to Print Layout view.
- Click to switch to Outline view.