Footnotes and Endnotes
Footnotes and endnotes contain supplemental information that’s referenced in the body of the document. Footnotes appear at the bottom of the page containing the reference, while endnotes appear together at the end of the document.
When you insert a footnote or endnote, you actually insert the reference—a number or symbol—into the body of your text. Once you insert the reference, Word jumps to the location of your reference text, so you can enter it. When you use reference numbers (rather than symbols), Word automatically updates the numbering as you insert new references. The references always remain linked to their corresponding text.
To insert a footnote or endnote:
- Position the insertion point where you want to insert the reference.
- Open the Insert menu and select Footnote.
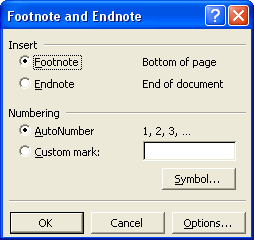
The Footnote and Endnote dialog opens.
- Select the type of note you want to insert: Footnote or Endnote.
- Under Numbering, select AutoNumber or Custom mark.
If you choose Custom mark, click the Symbol button to select the symbol you want your references to use (such as an asterisk).
- Click OK.
Word inserts the references and then moves to the cursor to the location of the reference text.
- Type the reference text.
- Use the mouse to return to the location in your document where you left off.
![]()
![]()
![]()
To quickly return to your previous position, right-click inside the reference text and, from the shortcut menu, select Go to Footnote or Go to Endnote, as appropriate. Word returns the cursor to location of the reference in the body of your document.
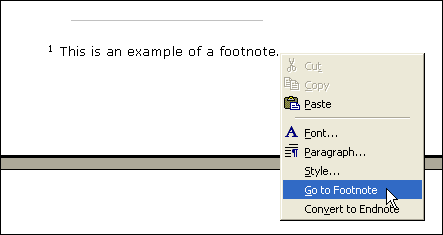

You can also use the shortcut menu to convert a footnote to an endnote, and vice versa. Simply right-click the reference text and choose the appropriate Convert to option from the menu.
You can view reference text at any time by moving your mouse over the reference in the body of the text; when you do this, Word displays the reference text in a popup.


To edit the text, double-click the reference mark, or just move the cursor to the reference text using your mouse or arrow keys.
To delete a reference, select the reference mark and press Delete on your keyboard. This removes both the reference mark and the associated text. Word automatically renumbers the remaining references in your document.
Set Footnote Options
By default, footnotes are located at the bottom of the page containing their reference marks, and endnotes are located at the end of the document. You can change the placement of footnotes and endnotes, as well as define numbering options, using the Options button in the Footnote and Endnote dialog:
- Open the Insert menu and select Footnote.
The Footnote and Endnote dialog opens.
- Click the Options button.
The Note Options dialog opens.
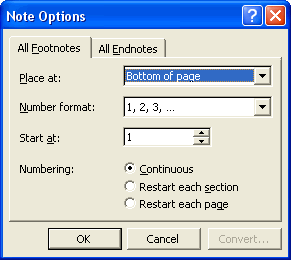

- Click the All Footnotes tab to define options or footnotes, or the All Endnotes tab to define options for endnotes.
- To change the location of the notes, select an option from the Place at drop-down menu. Footnotes can appear either at the bottom of the current page or directly beneath the current text; endnotes can appear either at the end of the document or the end of the current section.
- Choose a numbering format and enter a starting number, if you don’t want the notes to begin at 1.
- Choose when note numbering should restart, if ever, within the document. For instance, you may want to renumber footnotes beginning with 1 at the start of each section in your document, if each section represents a new chapter or a new article in a publication.
- Click OK to apply the options.
Format Footnotes
You format reference text just as you would the other text in your document. If you want to view and format all the notes in your document at once, switch to normal view ![]()
![]()
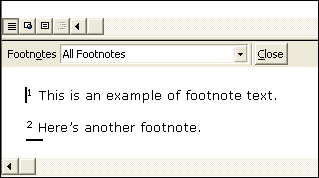

In the note pane, use your mouse to select the notes you want to format, and then apply the formatting using the buttons on the Formatting toolbar.
Word automatically inserts a separator line between footnote and endnote text and the body of the document. You can change the formatting of the separator by selecting it from the drop-down menu at the top of the notes pane.
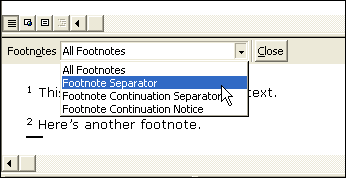

Selecting Footnote continuation separator and Endnote continuation separator from the same menu inserts a line between the main text of the document and notes that continue to the next page.
A Footnote continuation notice (or Endnote continuation notice) is a notice telling readers that notes continue on another page. To insert a continuation notice, select it from the menu and then type the text for the notice in the note pane.
Bookmarks
Bookmarks in Microsoft Word function the same way they do on a web page—as links to marked places in the document. Use bookmarks as a means of organizing and navigating longer documents. Simply click the link for a bookmark to jump to the linked-to location.
To insert a bookmark:
- Position your insertion point where you want to insert the bookmark. Alternatively, you can select text or an object that you want to bookmark.
- Open the Insert menu and select Bookmark.


- Enter a name for the bookmark. The name must begin with a letter and cannot include any spaces, though you can use underscores (_).
- Click the Add button.
To delete a bookmark:
- Open the Insert menu and select Bookmark.
- In the Bookmark dialog box, highlight the bookmark and click the Delete button.
Use Bookmarks
To display the bookmarks in your document:
- Open the Tools menu and select Options.
The Options dialog opens.
- Click the View tab.
- Under Show, select Bookmarks.


- Click OK.
Bookmarks are displayed as I-beams in the document. Bookmarked text appears in brackets.
To navigate to a bookmark in your document:
- Open the Insert menu and select Bookmark.
- In the Bookmark dialog, highlight the bookmark you want to go to and click Go To.
![]()
![]()
![]()
You can also navigate to a bookmark using the Find dialog: Press Ctrl + g (or simply F5) on your keyboard to open the dialog to the Go To tab. Select Bookmark from the list. Then select the name of the bookmark from the drop-down menu and click Go To.
Organize Bookmarks
Word displays a list of the bookmarks in your document in the Bookmark dialog. When a document includes a number of bookmarks, you can sort them by name or location, making it easier to find a specific bookmark when navigating:
- Open the Insert menu and select Bookmark.
- In the Bookmark dialog, choose Sort by Name or Location.
Sorting the list by name arranges the bookmarks in alphabetical order. Sorting by location arranges the bookmarks in the order in which they appear in the document.

