Macromedia Flash MX 2004 Part 2: Section 2
In this section, you will learn about:
- Understanding movie clips
- Using nested symbols
- Using movie clip events
Understanding Movie Clips
Using Nested Symbols
Like an animation on the Main Timeline, a movie clip can contain symbols like buttons, graphics and even other movie clips. This is called “nesting” symbols—embedding one symbol inside another. When a movie clip is nested inside another movie clip, the nested movie clip is called a “child” of the container clip. In other words, there is a hierarchical relationship among symbols, which is important to understand in order to control the events in the nested symbols.
For example, the movie below contains one instance of a movie clip on the Main Timeline, called “openingweather_mc”.
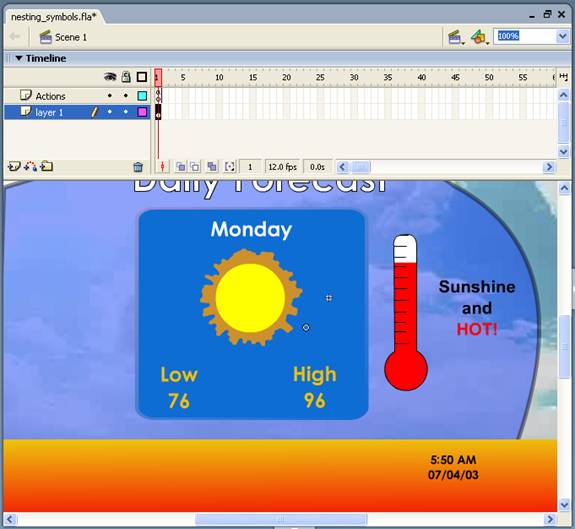
You can see the instance name in the Property Inspector:
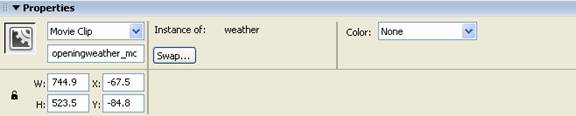
Notice that the Property Inspector also tells us that “openingweather_mc” is an instance of the movie clip symbol “weather”.
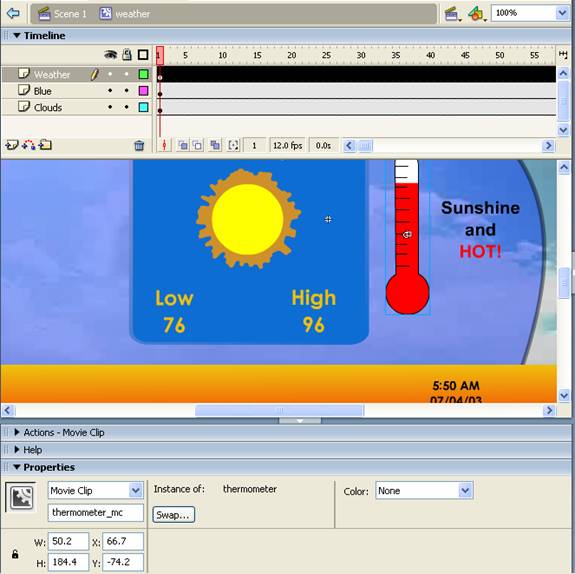
If we double-click on the movie clip instance on the Stage to enter Edit mode, we’ll find several objects comprising the animation. Two of these—the sun and the thermometer—are actually other animations contained in movie clips. If we select the thermometer, we can see in the Property Inspector that it’s an instance of the movie clip “thermometer”.
We can double-click the thermometer to view the Timeline that controls the animation, which uses a simple tween to show the thermometer rising:
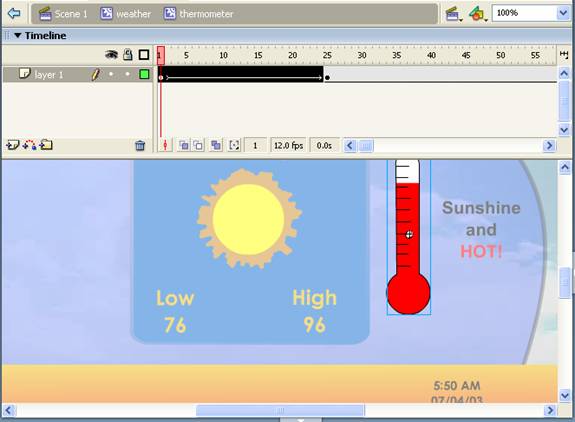
Notice that above the Timeline, we see first the name of the scene, then the weather movie clip, and then the thermometer movie clip. In complex movies, you can often dig several levels into a movie clip and find component parts.
In order to control these component parts from other parts of your movie, you need to understand how Flash expects you to refer to them. You already know that the instance name is used to refer to a specific object—an instance of a symbol on the Stage. But Flash also needs to know where within the hierarchy of nested symbols the object is located. In Flash, you can specify an object’s relative path or its absolute path.
These terms should be familiar, but in short, an absolute path specifies the path from the root, while a relative path specifies a path from the current location. Instead of using slashes to indicate a hierarchy, as used on a web site (http://www.mysite.com/directorya/directoryb/file.htm) or on a computer hard drive (c:\directorya\directoryb\file.doc), Flash uses “dot” syntax—that is, you use dots, or periods, instead of
slashes (_root.clipa.clipb.currentclip).
The “root” of a Flash movie is the Main Timeline, and so is aptly referred to with the “_root” keyword. Our weather_mc movie clip, residing on the Main Timeline, would be referred to using the absolute path: _root.weather_mc
Note:
“root” can also refer to the root of the current object.
When using absolute paths, always begin with the root and work your way through the hierarchy of nested symbols to reach the one you’re targeting.
If you’re referring to a symbol inside the current movie clip, it’s easier to use a relative path. The keyword “this” is used to refer to the current object—whatever object you’re adding the code to. For example, if we’re adding code to our weather_mc movie clip, we’d refer to the sun_mc movie clip inside it using the relative path: this.sun_mc
You can also reference a movie clip one level up from the current one using the “_parent” keyword. From our sun_mc movie clip, _parent would refer to the weather_mc movie clip. From there, you can use a relative path to target a clip within the parent’s hierarchy.
Flash gives you one final way to refer to a symbol’s location: using levels. Some functions have a “level” parameter, which simply refers to the level in the hierarchy you’re targeting, starting at the Main Timeline, level 0. Our weather_mc movie clip, residing on the Main Timeline, is located at level 1, and our sun_mc, inside the weather_mc movie clip, is located at level 2.
As a simple demonstration of targeting one movie clip instance from inside another, we’ll return to our moving car (motion tween) example. In the movie, we’ve converted the car, with its guide layer, to a movie clip, which we’ve added to the Stage on the Main Timeline. We’ve also added another movie clip, an animation of a fire hydrant spiraling into the air. We’ve deleted the buttons we added earlier.

The car animation is an instance of the movie clip “bad_driving” named “bad_driving_mc”. The fire hydrant animation is an instance of the movie clip “crash_clip” named “crash_mc”. The fire hydrant animation is positioned on the Stage at the end of the car’s path. But right now, the fire hydrant will begin spiraling into the air as soon as the movie loads—at the same time the car begins to move. We want it to wait until the car appears to “bump” into it. We could add some collision detection script, but for our purposes here, it’s sufficient to add an action to the appropriate frame of the car movie clip to begin playing the hydrant movie clip:
- First, we need to prevent the crash_mc movie clip instance from playing automatically. To do so, double-click on the movie clip to enter editing mode. On the first frame of the Actions layer, add the stop() action:
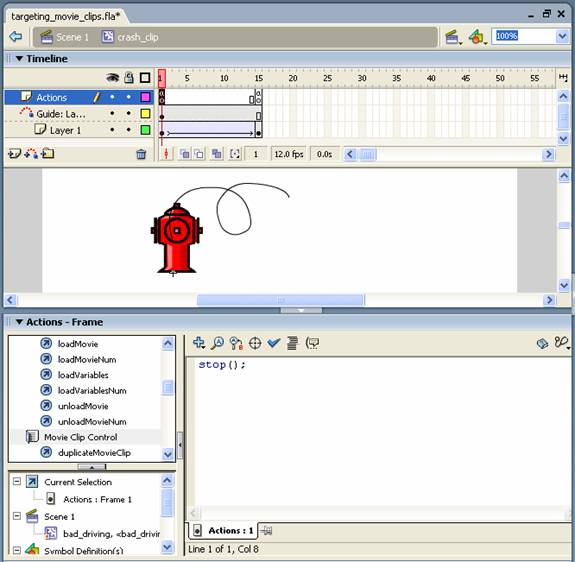
- Exit editing mode.
- Double-click on the bad_driving_mc movie clip to enter editing mode.
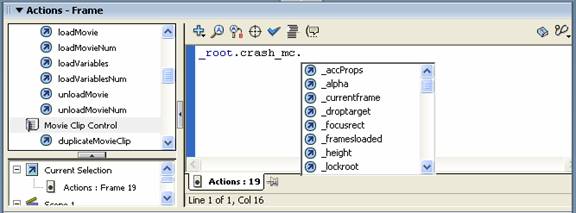
- Select the frame on the Actions layer that corresponds to the car’s position as it moves into the fire hydrant. For us, that’s frame 19.
- Open the Actions panel and click the Insert target path
 button. We’re going to use the helpful dialog to insert the path to our crash_mc movie clip instance:

- Select the target movie clip and click OK.
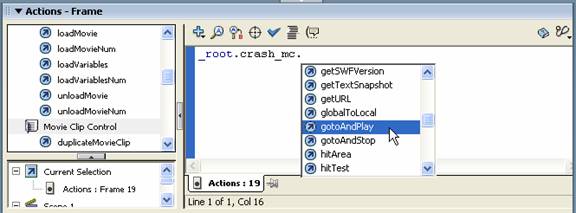
- Flash inserts the target path into the Script pane. Add a dot (.) at the end. When you do so, Flash interprets the target you added as an instance of the MovieClip object (something we describe in the next section) and displays a pop-up menu with all the object’s available properties and methods:
- Scroll through the menu and double-click the gotoAndPlay method:
- Flash adds the code. Finish the line by adding the frame number of the movie clip being played. We want to play the hydrant animation (crash_mc) from the beginning, so we’re entering frame 1:
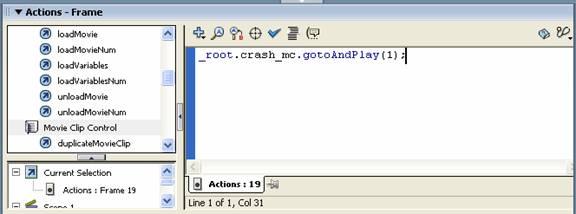
Now, when the playhead of the bad_driving_mc movie clip instance enters frame 19, the fire hydrant animation (crash_mc) will begin to play, simulating the effect of the car crashing into it. Although most animations use more sophisticated methods of detecting collisions, you can see from this how easy it is to control the Timeline of one movie clip instance from inside another.